一、Junit 单元测试
测试分类:
- 黑盒测试:给定输入值,看输出的结果是否符合预期
- 白盒测试:关注程序的具体执行流程
注意:
- Junit 测试
- Java 的断言 Assert
在进行某些特殊的测试的时候,比如 IO 测试,我们需要申请系统资源 ,这时候可以这样做:
import org.junit.After;
import org.junit.Before;
import org.junit.Test;

public class DemoTest {

    /**
     * 初始化方法,用于资源的申请,所有测试方法在执行前都会先执行该方法
     */
    @Before
    public void init() {
        System.out.println("init...");
    }

    /**
     * 释放资源的方法,在所有测试方法执行完后都会执行该方法
     */
    @After
    public void close() {
        System.out.println("close...");
    }

    @Test
    public void test() {
        System.out.println("testing...");
    }

}
二、反射
1、简介
反射:框架设计的灵魂
- 框架:半成品软件。我们会在框架的基础上进行软件开发,可以简化编码
- 反射:将类的各个组成部分封装为其他对象,这就是反射机制
- 好处:
- 在程序运行过程中操作这些对象。
- 可以解耦,提高程序的可扩展性
- 好处:
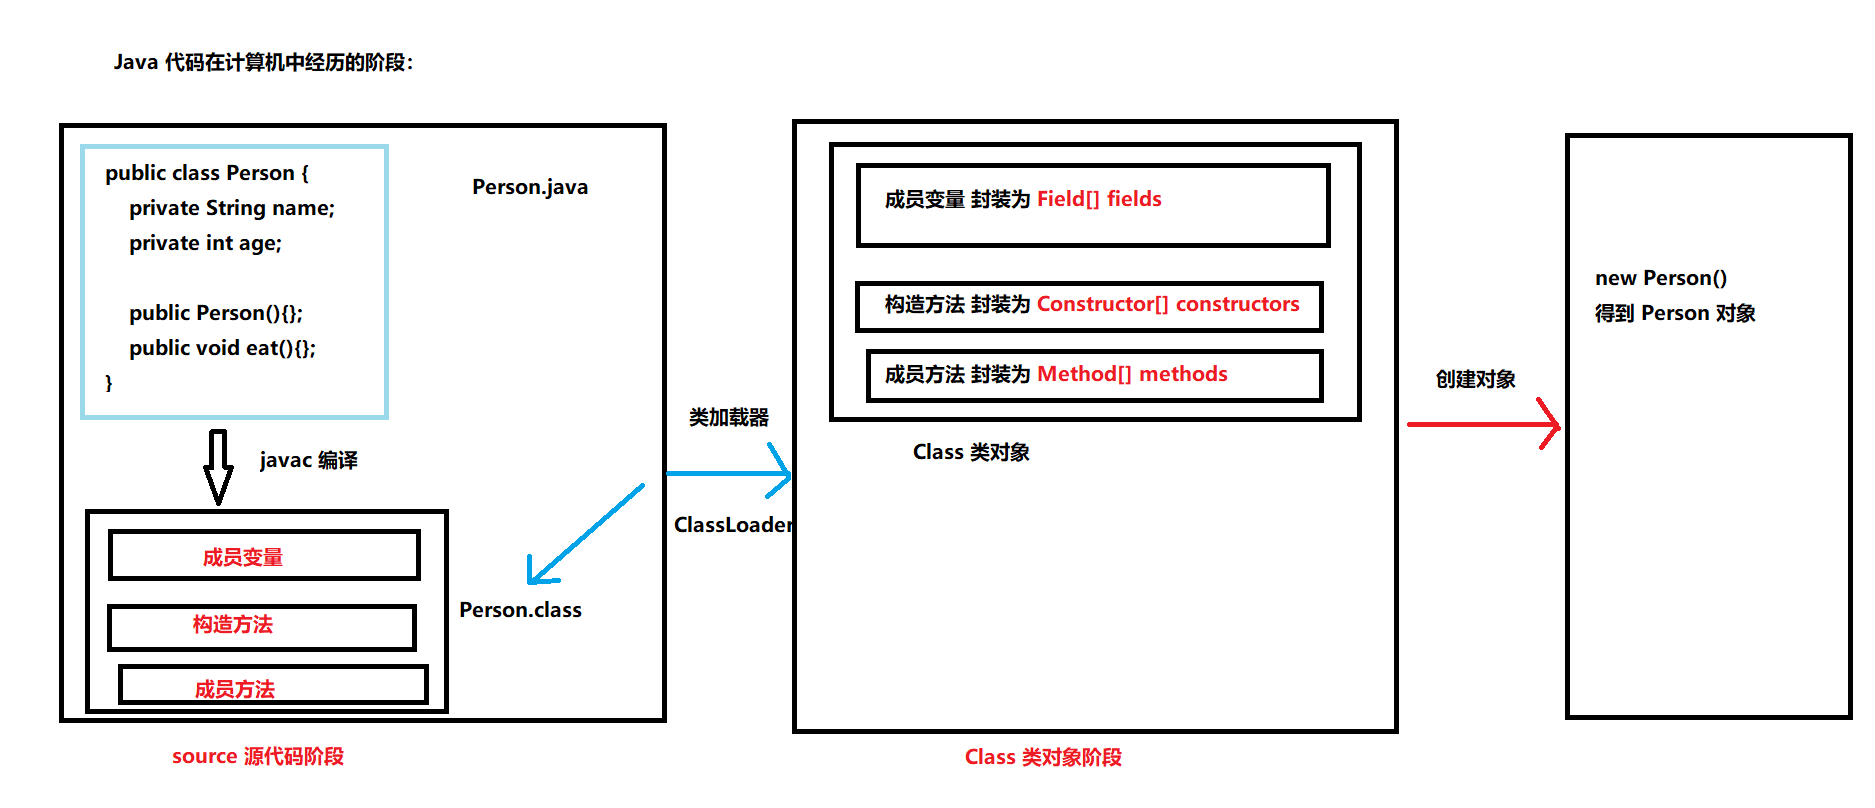
当我们使用 idea 编写 Java 代码时,如下面这段代码:

为什么我们能够看到字符串拥有的方法呢,其实就是 idea 将 Class 对象中的 Method[] methods 的内容展示出来了。
2、获取 Class 对象的方式
获取 Class 对象有三种方式,对应着上面那张图中的三个阶段:
我们先来看看它们的使用方式及常用场景:
- Source 源代码阶段
Class.forName("全类名"):将字节码文件加载进内存,返回 Class 对象- 多用于配置文件,将类名定义在配置文件中。读取文件加载类
- Class 类对象阶段
类名.class:通过类名的 class 属性获取 Class 对象- 多用于参数的传递,比如将 Xxx.class 作为参数传递给某个方法
- Runtime 运行时阶段
对象.getClass():该方法继承自 Object 类,所有对象都有该方法,通过它获取 Class 对象- 常用于使用对象获取对应的字节码文件
看下面的测试代码,我们可以得出:
- 结论:同一个字节码文件 *.class 在一次程序的运行过程中只会被类加载器加载一次,内存中只存在一个该类对应的 Class 对象。
/**
 * 获取 Class 对象的三种方式
 */
public class ReflectDemo1 {

    public static void main(String[] args) throws ClassNotFoundException {

        // 方式一: Class.forName()
        Class clazz1 = Class.forName("com.naivekyo.Java_reflect.Person");
        System.out.println(clazz1);

        // 方式二:类名.class
        Class clazz2 = Person.class;
        System.out.println(clazz2);

        // 方式三:对象.getClass
        Class clazz3 = new Person().getClass();
        System.out.println(clazz3);

        // 比较这三个 Class 对象
        System.out.println(clazz1 == clazz2);   // true
        System.out.println(clazz2 == clazz3);   // true
    }
}

class Person {

    private String name;

    private int age;

    public Person() {
    }

    public Person(String name, int age) {
        this.name = name;
        this.age = age;
    }

    public String getName() {
        return name;
    }

    public void setName(String name) {
        this.name = name;
    }

    public int getAge() {
        return age;
    }

    public void setAge(int age) {
        this.age = age;
    }

    public void selfIntro() {
        System.out.println("姓名: " + this.name + " 年龄: " + this.age);
    }
}
3、使用 Class 对象
常用的方法:
Class 对象的获取功能:
获取成员变量
Field getField(String name)Field[] getFields()- 上面两个方法获取所有 public 修饰的成员变量
Field getDeclaredField(String name)Field[] getDeclaredFields()- 后面两个方法获取所有成员变量(不论修饰符)
获取构造方法
Constructor<T> getConstructor(类<?>... parameterTypes)Constructor<?>[] getConstructors()- 上面两个方法获取所有 public 修饰的构造器对象
Constructor<T> getDeclaredConstructor(类<?>... parameterTypes)Constructor<?>[] getDeclaredConstructors()- 后面两个方法获取所有构造器对象(不论修饰符)
获取成员方法
Method getMethod(String name, 类<?>... parameterTypes)Method[] getMethods()- 前两个方法获取所有 public 修饰的成员方法对象
Method getDeclaredMethod(String name, 类<?>... parameterTypes)Method[] getDeclaredMethods()- 后两个方法获取所有成员方法对象(不论修饰符)
获取类名
String getName()
(1)成员变量对象 Field
拿到 Class 对象中的成员对象后,我们一般会做两个操作:
- 设置值
void set(Object obj, Object value)
- 获取值
get(Object obj)
- 忽略访问修饰符的安全检查
setAccessible(boolean flag)设置为 true 可以忽略修饰符,也称为暴力反射
基本演示:获取 public 修饰的变量:
// 0. 获取 Class 对象
Class clazz = Person.class;

// 1. 获取所有 public 成员变量
Field[] fields = clazz.getFields();
for (Field field : fields) {
  System.out.println(field);
}

// 2. 获取指定的 public 修饰的变量
Field hobby = clazz.getField("hobby");

// 3. 演示操作 Field
Person person = new Person();   // 无参构造

Object value = hobby.get(person);
System.out.println(value);  // 如果使用无参构造,此处获取的是 null

hobby.set(person, "敲代码");
Object newVal = hobby.get(person);
System.out.println(newVal); // 此时已经有值了,所以此处打印 : 敲代码
System.out.println(person); // Person{name='null', age=0, hobby='敲代码'}
基本演示:获得所有修饰符成员对象,并修改它们
// 1. 获取 Class 对象
Class clazz = Person.class;

// 2. 获取所有成员变量, 不考虑修饰符
Field[] declaredFields = clazz.getDeclaredFields();
for (Field declaredField : declaredFields) {
  System.out.println(declaredField);
}

// 3. 为成员变量赋值
Person person = new Person();

Field name = clazz.getDeclaredField("name");

// 注意即使我们可以获取到私有的 Field,但是想要操作它还是必须要设置允许访问
// 忽略访问权限修饰符的安全检查
name.setAccessible(true);

// 先打印值
System.out.println(name.get(person));   // null

// 设置值后打印
name.set(person, "张三");
System.out.println(person);     // Person{name='张三', age=0, hobby='null'}
(2)构造方法对象 Constructor
Constructor:构造方法对象
- 创建对象:
T newInstance(Object... initargs)- 这里指有参构造,如果使用无参构造创建对象可以使用
Class.newInstance()
基本使用:
public class ReflectDemo3 {

    public static void main(String[] args) throws Exception {

        // 1. 获取 Class 对象
        Class<Animal> clazz = Animal.class;

        // 2. 获取所有构造方法
        // Constructor<?>[] constructors = clazz.getConstructors();
        //
        // for (Constructor<?> constructor : constructors) {
        //     System.out.println(constructor);
        // }

        // 3. 获取指定构造方法
        Constructor<Animal> constructor = clazz.getConstructor(String.class, String.class);

        // 以指定构造器创建对象
        Animal animal = constructor.newInstance("中华田园猫", "猫");

        System.out.println(animal);

        /*
            如果类中有私有构造器方法,可以使用 Constructor<T> getDeclaredConstructor(类<?>... parameterTypes)
            获取指定的构造器方法,如果该构造器为私有方法,则需要指定忽略安全检查
         */
    }
}

class Animal {

    private String name;

    private String species;

    public Animal() {
    }

    public Animal(String name, String species) {
        this.name = name;
        this.species = species;
    }

    public String getName() {
        return name;
    }

    public void setName(String name) {
        this.name = name;
    }

    public String getSpecies() {
        return species;
    }

    public void setSpecies(String species) {
        this.species = species;
    }

    @Override
    public String toString() {
        return "Animal{" +
                "name='" + name + '\'' +
                ", species='" + species + '\'' +
                '}';
    }
}
(3)方法对象 Method
功能:
执行方法:
Object invoke(Object obj, Object... args)
获取方法的名称:
String getName()
基本使用:
public class ReflectDemo4 {

    public static void main(String[] args) throws Exception {

        // 1. 获取 Class 对象
        Class<House> houseClass = House.class;

        // 2. 获取所有 public 修饰的成员方法
        for (Method method : houseClass.getMethods()) {
            // 注意这里把所有 public 方法都打印了,其中包括从父类继承的方法
            System.out.println(method);
            // 打印方法名称
            System.out.println(method.getName());
        }

        System.out.println("=======================================");

        // 3. 获取该类特有的所有成员方法,不包括继承自父类的方法
        for (Method declaredMethod : houseClass.getDeclaredMethods()) {
            System.out.println(declaredMethod);
            // 打印方法名称
            System.out.println(declaredMethod.getName());
        }

        System.out.println("========================================");
        // 4. 执行 public 和 private 方法
        Method show = houseClass.getDeclaredMethod("show");
        show.invoke(new House("平房"));

        Method price = houseClass.getDeclaredMethod("showPrice", float.class);
        price.setAccessible(true);
        price.invoke(new House("高楼"), 1000f);
    }
}

class House {

    private String type;

    public House(String type) {
        this.type = type;
    }

    public String getType() {
        return type;
    }

    public void setType(String type) {
        this.type = type;
    }

    public void show() {
        System.out.println("房子的类型: " + type);
    }

    private void showPrice(float price) {
        System.out.println("房子的价格: " + price);
    }
}
4、案例
需求:一个类可以创建任意类的对象,并且执行其中的方法
实现:
- 配置文件
- 反射
步骤:
- 将需要创建的对象的全类名和需要执行的方法定义在配置文件中
- 在程序加载并读取配置文件
- 使用反射技术加载类文件到内存中
- 创建对象
- 执行方法
className = com.naivekyo.Reflect_Test.bean.People
methodName = selfIntro
name = 张三
age = 20
public class ReflectTest {
public static void main(String[] args) throws Exception {
// 1. 读取配置文件
// 创建配置文件对象
Properties properties = new Properties();
// 使用当前类的加载器去获取配置文件的流对象
ClassLoader classLoader = ReflectTest.class.getClassLoader();
// 记得配置文件放在 resources 目录下,这里要考虑到类加载器加载文件的位置
// 挖坑:类加载器的种类和特点
InputStream ras = classLoader.getResourceAsStream("config.properties");
// 加载配置文件
properties.load(new InputStreamReader(ras));
// 2. 获取配置文件中定义的数据
String className = properties.getProperty("className");
String methodName = properties.getProperty("methodName");
String name = properties.getProperty("name");
String age = properties.getProperty("age");
// 3. 将类加载进内存,并创建对象
Class<?> clz = Class.forName(className);
Constructor<?> constructor = clz.getDeclaredConstructor(String.class, int.class);
Object obj = constructor.newInstance(name, Integer.parseInt(age));
// 4. 执行方法
Method method = clz.getDeclaredMethod(methodName);
method.invoke(obj);
}
}5、总结
反射机制在框架中使用的非常多,它不仅仅可以获取类的 成员变量、构造方法、成员方法,还可以获取类上的 注解、使用的 泛型 等等。
掌握反射对我们学习 Java 和 各种框架有很大的好处。
三、注解
1、概念
对比注释和注解:
- 注释:用文字去描述,放在类上是描述类的功能,放在方法上是描述如何使用方法,这是给类的使用者看的
- 注解:描述代码的配置信息、元数据,是给程序看的,是 JDK1.5 之后出现的新特性
2、作用
注解的作用分类:
- 编写文档:通过代码中标识的元数据生成文档(比如生成 doc 文档)
- 代码分析:通过代码中标识的元数据对代码进行分析(使用反射)
- 编译检查:通过代码中标识的元数据让编译器能够实现基本的编译检查(例如 @Override 注解)
3、JDK 中预定义的注解
@Override@Deprecated@SuppressWarnings
4、自定义注解
(1)格式
- 格式:
- 元注解
public @interface 注解名称{}
先自定义一个注解:
public @interface MyAnno {

}
然后使用 javap 命令反编译:
public interface MyAnno extends java.lang.annotation.Annotation {}(2)本质
- 本质:注解本质上就是一个接口,该接口默认继承 Annotation 接口
由此可知,接口中可以定义的东西,注解中也可以
(3)属性
- 属性:接口中的抽象方法
- 要求
- 属性的返回值类型只能是以下几种
- 基本数据类型
- String
- 枚举
- 注解
- Class 对象
- 以上类型的数组
- 定义了属性,在使用注解时必须给属性赋值
- 当然,在定义属性时,可以使用 default 关键字给属性定义一个默认值,这时在使用注解时,该值可以不用显式赋值
- 有一个很特殊的属性:
value(),如果注解中只有这一个属性或者有多个属性,但是其他属性都有默认值,此时,使用注解时可以省略 value 直接给属性赋值 - 数组赋值时,值使用
{}包裹。如果数组中只有一个值,则{}可以省略
- 属性的返回值类型只能是以下几种
- 要求
public @interface MyAnno {

    int age();

    String name();

    Person person();

    MyAnno_Re ann0Re();

    String[] strs();
}

enum Person {

    p1, p2;
}

@interface MyAnno_Re {

}
使用该注解:
@MyAnno(age = 12, name = "张三", person = Person.p1, ann0Re = @MyAnno_Re,strs = {"1", "2", "3"})
public class AnnoClass {
}
特殊值 value:
// 定义注解
public @interface MyAnno {

    int value();

    int age() default 1;
}

// 使用注解
@MyAnno(12)
public class AnnoClass {
}
5、元注解
元注解:用于描述注解的注解
比如 @Override 注解
@Target(ElementType.METHOD)
@Retention(RetentionPolicy.SOURCE)
public @interface Override {
}
我们需要掌握以下几个元注解:
@Target:描述注解的作用位置(类、方法 ……)@Retention:描述注解被保留的阶段(Java 代码的三个阶段)@Documented:描述注解是否被抽取到 api 文档中(使用 javadoc)@Inherited:描述注解是否被子注解继承
(1)@Target
@Documented
@Retention(RetentionPolicy.RUNTIME)
@Target(ElementType.ANNOTATION_TYPE)
public @interface Target {
    /**
     * Returns an array of the kinds of elements an annotation type
     * can be applied to.
     * @return an array of the kinds of elements an annotation type
     * can be applied to
     */
    ElementType[] value();
}
value 是一个枚举数组:描述了注解作用域
public enum ElementType {
    /** Class, interface (including annotation type), or enum declaration */
    TYPE,

    /** Field declaration (includes enum constants) */
    FIELD,

    /** Method declaration */
    METHOD,

    /** Formal parameter declaration */
    PARAMETER,

    /** Constructor declaration */
    CONSTRUCTOR,

    /** Local variable declaration */
    LOCAL_VARIABLE,

    /** Annotation type declaration */
    ANNOTATION_TYPE,

    /** Package declaration */
    PACKAGE,

    /**
     * Type parameter declaration
     *
     * @since 1.8
     */
    TYPE_PARAMETER,

    /**
     * Use of a type
     *
     * @since 1.8
     */
    TYPE_USE
}
基本使用:
@MyAnno3
public class AnnoDemo1 {

    @MyAnno5
    private String name;

    @MyAnno4
    public void show() {}
}

@Target(ElementType.TYPE)   // 作用域:类
@interface MyAnno3 {
}

@Target(ElementType.METHOD) // 作用域:方法
@interface MyAnno4 {
}

@Target(ElementType.FIELD) // 作用域:成员变量
@interface MyAnno5 {
}

@Target({ElementType.TYPE, ElementType.FIELD, ElementType.METHOD})
@interface MyAnno6 {
}
(2)@Retention
@Documented
@Retention(RetentionPolicy.RUNTIME)
@Target(ElementType.ANNOTATION_TYPE)
public @interface Retention {
    /**
     * Returns the retention policy.
     * @return the retention policy
     */
    RetentionPolicy value();
}
value 是一个保留方针:对应着 Java 代码的三个阶段
源代码 (.java):只保留到 .java 文件,交给编译器识别
字节码 (.class):保留到 .class 文件但是 JVM 不识别
对象(运行时,该注解保留到 .calss 文件中并且 JVM 会去识别,我们自定义注解一般使用的都是它)
public enum RetentionPolicy {
    /**
     * Annotations are to be discarded by the compiler.
     */
    SOURCE,

    /**
     * Annotations are to be recorded in the class file by the compiler
     * but need not be retained by the VM at run time.  This is the default
     * behavior.
     */
    CLASS,

    /**
     * Annotations are to be recorded in the class file by the compiler and
     * retained by the VM at run time, so they may be read reflectively.
     *
     * @see java.lang.reflect.AnnotatedElement
     */
    RUNTIME
}
基本使用:
@Target(ElementType.TYPE)   // 作用域:类
@Retention(RetentionPolicy.RUNTIME)
@interface MyAnno3 {
}
(3)@Documented
@Documented
@Retention(RetentionPolicy.RUNTIME)
@Target(ElementType.ANNOTATION_TYPE)
public @interface Documented {
}
基本使用:
@Target(ElementType.TYPE)   // 作用域:类
@Retention(RetentionPolicy.RUNTIME)
@Documented // 此注解在使用 javadoc 后,会将该注解显示到文档对应的位置
@interface MyAnno3 {
}
6、程序中使用(解析)注解
解析注解:获取注解中定义的属性值
我们现在定义的注解其实是没有什么用的,它只是一些元数据,标注在类上,如果想让它发挥作用,我们必须实现注解的处理器,在运行时阶段识别类上的注解并且解析注解中定义的属性值,从而对类进行操作。
而在框架中,我们经常使用注解去替换配置文件,或者做一些其他的处理(比如创建对象时的属性注入)。
需求:使用注解重构之前的使用配置文件加载类并执行方法的案例
使用这两个注解:
@Target(ElementType.TYPE)
@Retention(RetentionPolicy.RUNTIME)
public @interface PropertiesAnno {

    String className();

    String methodName();
}

@Target(ElementType.FIELD)
@Retention(RetentionPolicy.RUNTIME)
@interface FieldAnno {

    String value();
}
处理器:
/**
 * 注解的处理器
 */
@PropertiesAnno(className = "com.naivekyo.Java_Annotation.People", methodName = "selfIntro")
public class PropertiesClass {

    public static boolean assertStrToInteger(String str, Predicate<String> predicate) {

        return predicate.test(str);
    }

    public static void main(String[] args) throws Exception {

        // ================== 解析注解 ===============

        // 1. 获取该类的字节文件对象
        Class<PropertiesClass> clazz = PropertiesClass.class;

        // 2. 获取注解对象
        // 其实就是在内存中生成了一个该注解接口的子类实现对象
        PropertiesAnno an = clazz.getDeclaredAnnotation(PropertiesAnno.class);

        // 3. 调用注解对象中定义的抽象方法,获取返回值
        String className = an.className();
        String methodName = an.methodName();

        // ================= 加载类 ====================

        // 1. 获取目标类的字节码文件
        Class<?> targetClz = Class.forName(className);

        Object target = targetClz.newInstance();

        // 2. 获取目标类属性上绑定的值并注入到目标对象中
        for (Field declaredField : targetClz.getDeclaredFields()) {

            declaredField.setAccessible(true);

            FieldAnno annotation = declaredField.getAnnotation(FieldAnno.class);
            Class<?> fieldClz = annotation.clazz();
            String value = annotation.value();

            // 判断 value 是不是整型数据类型
            boolean result = assertStrToInteger(value, (val) -> {
                try {
                    Integer.parseInt(val);
                } catch (Exception e) {
                    return false;
                }
                return true;
            });

            if (result) {
                declaredField.set(target, Integer.parseInt(value));
            } else {
                declaredField.set(target, value);
            }

            // 下面的方法不行,暂时还不能实现类型推断功能 TODO
            // Object cast = null;
            // 这里判断 value 是不是 fieldClz 类型的对象
            // if (fieldClz.isInstance(value)) {
            //     cast = fieldClz.cast(value);
            // }
        }

        // 3. 执行目标对象的方法
        for (Method declaredMethod : targetClz.getDeclaredMethods()) {
            if (declaredMethod.getName().equals(methodName)) {
                declaredMethod.invoke(target);
            }
        }
    }
}

class People {

    @FieldAnno(value = "张三", clazz = String.class)
    private String name;

    @FieldAnno(value = "22", clazz = Integer.class)
    private Integer age;

    public People() {
    }

    public People(String name, Integer age) {
        this.name = name;
        this.age = age;
    }

    public String getName() {
        return name;
    }

    public void setName(String name) {
        this.name = name;
    }

    public Integer getAge() {
        return age;
    }

    public void setAge(int age) {
        this.age = age;
    }

    public void selfIntro() {

        System.out.println("姓名: " + name + "\n年龄: " + age);
    }

    @Override
    public String toString() {
        return "People{" +
                "name='" + name + '\'' +
                ", age=" + age +
                '}';
    }
}
7、解析注解
- 获取标注了注解的某个对象(Class、Method、Field、Constructor ……)
- 获取该对象上标注的注解:
getAnnotation(Class)(实质上获取的是内存中该注解接口实现类的对象) - 调用注解对象中的抽象方法获取注解属性配置的值
小案例:简单的测试框架
注解:
@Target(ElementType.METHOD)
@Retention(RetentionPolicy.RUNTIME)
public @interface Check {
}
被标注的类:
public class Calculate {

    @Check
    public void add() {
        System.out.println("1 + 0 = " + (1 + 0));
    }

    @Check
    public void sub() {
        System.out.println("1 - 0 = " + (1 - 0));
    }

    @Check
    public void mul() {
        System.out.println("1 * 0 = " + (1 * 0));
    }

    @Check
    public void div() {
        System.out.println("1 / 0 = " + (1 / 0));
    }

    public void show() {
        System.out.println("show ...");
    }
}
注解的处理器:
// 简单的测试框架, 当主方法执行后会自动执行所有检测到的方法(Check 注解), 判断方法是否有异常,如果有异常,就记录到文件中
public class TestCheck {

    public static void main(String[] args) throws IOException {

        // 1. 创建计算器对象
        Calculate c = new Calculate();

        // 2. 获取 Class 对象
        Class<? extends Calculate> aClz = c.getClass();

        int num = 0; // 出现异常的次数
        BufferedWriter bw = new BufferedWriter(new FileWriter("bug.txt"));  // 项目根目录

        // 3. 获取所有方法
        for (Method method : aClz.getMethods()) {
            if (method.isAnnotationPresent(Check.class)) {
                try {
                    method.invoke(c);
                } catch (Exception e) {
                    // 捕获异常记录到文件中
                    num++;
                    bw.write(method.getName() + " 方法出现异常");
                    bw.newLine();
                    bw.write("异常的名称: " + e.getCause().getClass().getSimpleName());
                    bw.newLine();
                    bw.write("异常的原因: " + e.getCause().getMessage());
                    bw.newLine();
                    bw.write("----------------------");
                    bw.newLine();
                }
            }
        }
        bw.write("本次测试一共出现 " + num + " 次异常");
        bw.flush();
        bw.close();
    }
}
8、小结
- 使用注解的场景有很多,特别是在框架的学习中,掌握注解的概念、使用方法、结构对我们很重要
- 注解给谁用?
- 编译器
- 注解的处理器
- 注解不是程序的一部分,可以这样理解:注解仅仅是一个标签,给目标加上了一些元数据,这些数据真正有用的地方是在注解的处理程序中