创建 Spring MVC
目标:
- 分析 Spring MVC 自身的创建过程
- 分析 Spring MVC 的整体架构
- 具体分析每一层的创建过程
1、整体结构分析
(1)SpringMVC 中 Servlet 类图
Spring MVC 中核心 Servlet 的继承结构如下:

可以看到在 Servlet 的继承结构中一共有 5 个类,GenericServlet 和 HttpServlet 在 Java 中,之前已经分析过,剩下的三个类 HttpServletBean、FrameworkServlet 和 DispatcherServlet 是 Spring MVC 的,下面主要分析这三个类的创建过程。
这三个类直接实现三个接口:EnvironmentCapable、EnvironmentAware 和 ApplicationContextAware。
(2)Capable 和 Aware
XXXAware 在 spring 中表示对 XXX 可以感知,通俗点解释就是:如果在某个类里面想要使用 spring 的一些东西,就可以通过实现 XXXAware 接口告诉 spring,spring 看到后就会给你送过来,而接收的方式是通过实现接口中唯一的方法 set-XXX。
比如,有一个类需要使用当前的 ApplicationContext,那么我们只需要让它实现 ApplicationContextAware 接口,然后实现接口中唯一的方法:void setApplicationContext(ApplicationContext applicationContext) 就可以了,spring 会自动调用这个方法将 applicationContext 传给我们,我们只需要接收就可以了,非常方便。
- EnvironmentCapable
- 顾名思义,就是具有 Environment 的能力,也就是可以提供 Environment ,所以 EnvironmentCapable 唯一的方法就是 Environment getEnvironment(),用于实现 EnvironmentCapable 接口的类,就是告诉 spring 它可以提供 Environment,当 spring 需要 Environment 的时候就会调用其 getEnvironment 方法跟它要。
了解了 Aware 和 Capable 的意思后,下面看看 ApplicationContext 和 Environment。
前者是应用上下文,后者是环境的意思,具体功能和之前的 ServletContext 有点类似。
实际上在 HttpServletBean 中 Environment 使用的是 StandardServletEnvironment(在 createEnvironment 方法中创建),这里确实封装了 ServletContext,同时还封装了 ServletConfig、JndiProperty、系统环境变量和系统属性,这些都封装到其 propertySources 属性下。
(3)浅析 Environment
下面我们来测试一下,在之前测试项目的 HelloController 中获取 Environment,然后调试看一下。
@Controller
public class HelloController implements EnvironmentAware {

    private Environment environment = null;

    @Override
    public void setEnvironment(Environment environment) {
        this.environment = environment;
    }

    private final Log logger = LogFactory.getLog(HelloController.class);

    // 处理 Head 类型的 "/" 请求
    @RequestMapping(value = {"/"}, method = {RequestMethod.HEAD})
    public String head() {
        return "hello.jsp";
    }

    // 处理 GET 类型的 "/index" 和 "/" 请求
    @RequestMapping(value = {"index", "/"}, method = {RequestMethod.GET})
    public String index(Model model) throws Exception {

        logger.info("================= processed by index ===================");
        // 返回 msg 参数
        // 在下面的语句前设置断点
        model.addAttribute("msg", "Go Go Go");

        return "hello.jsp";
    }
}
同时为了看得更加清楚,可以显式的设置 Servlet 定义时的 contextConfigLocation 属性:
<!-- web.xml -->
<servlet>
    <servlet-name>springmvc</servlet-name>
    <servlet-class>org.springframework.web.servlet.DispatcherServlet</servlet-class>
    <init-param>
        <param-name>contextConfigLocation</param-name>
        <param-value>WEB-INF/springmvc-servlet.xml</param-value>
    </init-param>
    <load-on-startup>1</load-on-startup>
</servlet>
调试后可以看到:
- Environment 结构及其内容图

ServletConfigPropertySource
可以看到 propertySources 中确实包含了之前提到了 5 个属性,然后看一下 ServletConfigProerty 的内部结构:
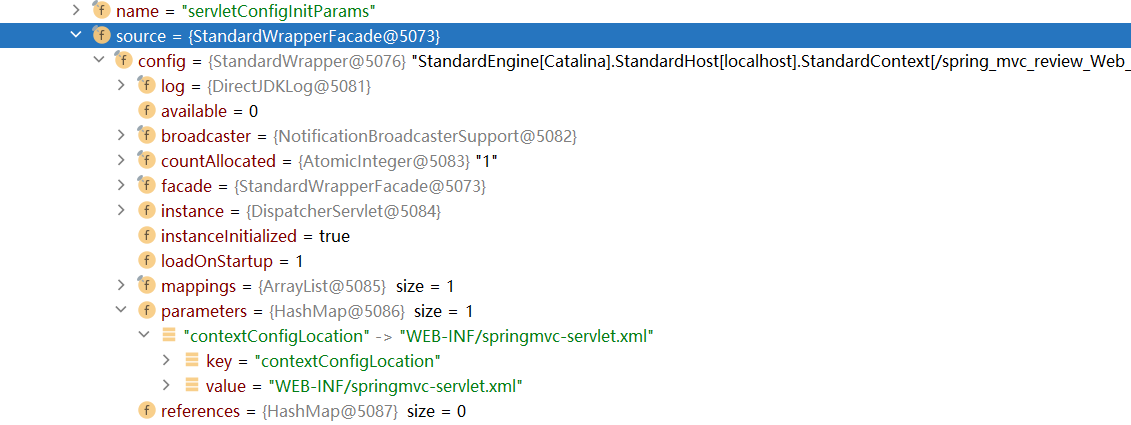
- ServletConfigPropertySource 结构图

可以看到 ServletConfigPropertySource 的 source 类型是 StandardWrapperFacade,也就是 Tomcat 里定义的 ServletConfig 类型(实现了该接口),所以 ServletConfigPropertySource 封装的就是 ServletConfig。
在 web.xml 中定义的 contextConfiguration 可以在 config 下的 parameters 里看到,这里还可以看到 name 和 parent 等属性。当然,这里的 config 是私有的,不可以直接调用,config 其实就是 Tomcat 中的 StandardWrapper —— 存放 Servlet 的容器: 如下图:
还可以看到 name 和 parent(父容器):

ServletContextPropertySource
除此之外,我们还可以看看 propertySources 中的 ServletContextPropertySource 中保存的 ServletContext:

可以看到这里 source 保存的是 Tomcat 中 Context 容器的门面类 ApplicationContextFacade。
JndiPropertySource
剩下的 JndiPropertySource 从名字上就很容易理解,存放的是 Jndi,由于这里没有使用 Jndi,所以暂不分析。
PropertiesPropertySource
PropertiesPropertySource 的 name 是 systemProperties,source 存放的是我们所用的虚拟机的属性,如 Java 的版本、所用操作系统的名称、操作系统的版本号、用户主目录、临时目录、Catalina(Tomcat)的目录等内容。
SystemEnvironmentPropertySource
SystemEnvironmentPropertySource 存放的是环境变量,也就是我们设置的 JAVA_HOME、Path 等属性。
由此可见,Environment 的功能非常强大,我们可以慢慢体会程序中 “环境” 这个词的含义。
看完整体结构,接下来分别看一下 spring 中三个类的具体创建过程。
2、HttpServletBean
(1)HttpServletBean 的 init
通过之前对 Servlet 的分析,我们知道 Servlet 创建时可以直接调用无参数的 init 方法。
HttpSerlvetBean 的 init 方法如下:
// org.springframework.web.servlet.HttpServletBean

@Override
public final void init() throws ServletException {

    // 将 Servlet 中配置的参数封装到 pvs 变量中,requiredProperties 为必需参数,如果没配置将报错
    PropertyValues pvs = new ServletConfigPropertyValues(getServletConfig(), this.requiredProperties);
    if (!pvs.isEmpty()) {
        try {
            BeanWrapper bw = PropertyAccessorFactory.forBeanPropertyAccess(this);
            ResourceLoader resourceLoader = new ServletContextResourceLoader(getServletContext());
            bw.registerCustomEditor(Resource.class, new ResourceEditor(resourceLoader, getEnvironment()));
            // 模板方法,可以在子类调用,做一些初始化工作,bw 代表 DispatcherServlet
            initBeanWrapper(bw);
            // 将配置的初始化值(如 contextConfigLocation 设置到 DispatcherServlet
            bw.setPropertyValues(pvs, true);
        }
        catch (BeansException ex) {
            if (logger.isErrorEnabled()) {
                logger.error("Failed to set bean properties on servlet '" + getServletName() + "'", ex);
            }
            throw ex;
        }
    }

    // 模板方法,子类初始化的入口方法
    initServletBean();
}
可以看到,在 HttpServletBean 的 init 中,首先将 web.xml 中 Servlet 中配置的参数使用 BeanWrapper 设置到 DispatcherServlet 的相关属性,然后调用模板方法 initServletBean,子类就可以通过这个方法初始化。
(2)补充 BeanWrapper
Q:BeanWrapper 是什么?怎么用?
A:BeanWrapper 是 Spring 提供的一个用来操作 JavaBean 属性的工具,使用它可以直接修改一个对象的属性,示例如下:
public class BeanWrapperTest {

    static class User {

        String userName;

        public String getUserName() {
            return userName;
        }

        public void setUserName(String userName) {
            this.userName = userName;
        }

        @Override
        public String toString() {
            return "User{" +
                    "userName='" + userName + '\'' +
                    '}';
        }
    }

    @Test
    public void customTest() {

        User user = new User();
        user.setUserName("张三");

        System.out.println("未修改前: " + user);

        BeanWrapper bw = PropertyAccessorFactory.forBeanPropertyAccess(user);
        bw.setPropertyValue("userName", "李四");

        System.out.println("修改后: " + user);

        PropertyValue value = new PropertyValue("userName", "王五");

        bw.setPropertyValue(value);

        System.out.println("第二次修改后: " + user);
    }
}
这个例子简单的介绍了 BeanWrapper 是如何使用的,理解了这个例子,就可以理解 HttpServletBean 中设置属性的方法了。
3、FrameworkServlet
(1)初始化方法 initServletBean
从 HttpServletBean 中可知,FrameworkServlet 的初始化入口方法应该是 initServletBean (模板方法),其代码如下:
// org.springframework.web.servlet.FrameworkServlet

@Override
protected final void initServletBean() throws ServletException {
    getServletContext().log("Initializing Spring " + getClass().getSimpleName() + " '" + getServletName() + "'");
    if (logger.isInfoEnabled()) {
        logger.info("Initializing Servlet '" + getServletName() + "'");
    }
    long startTime = System.currentTimeMillis();

    try {
        // 核心代码
        this.webApplicationContext = initWebApplicationContext();
        initFrameworkServlet();
    }
    catch (ServletException | RuntimeException ex) {
        logger.error("Context initialization failed", ex);
        throw ex;
    }

    if (logger.isDebugEnabled()) {
        String value = this.enableLoggingRequestDetails ?
            "shown which may lead to unsafe logging of potentially sensitive data" :
        "masked to prevent unsafe logging of potentially sensitive data";
        logger.debug("enableLoggingRequestDetails='" + this.enableLoggingRequestDetails +
                     "': request parameters and headers will be " + value);
    }

    if (logger.isInfoEnabled()) {
        logger.info("Completed initialization in " + (System.currentTimeMillis() - startTime) + " ms");
    }
}
可以看到这里的核心代码只有两句:一句用于初始化 WebApplicationContext(这里的 web 应用程序上下文指的是 Spring 容器的),另一句用于初始化 FrameworkServlet,而且 initFrameworkServlet 方法是模板方法,子类可以覆盖然后再里面做一些初始化工作,但子类并没有使用它:
// org.springframework.web.servlet.FrameworkServlet#initServletBean
this.webApplicationContext = initWebApplicationContext();
initFrameworkServlet();
可见 FrameworkServlet 在构建的过程中主要作用是初始化了 WebApplicationContext。
(2)初始化方法 initWebApplicationContext
下面看一看 initWebApplicationContext() 方法:
// org.springframework.web.servlet.FrameworkServlet#initWebApplicationContext

protected WebApplicationContext initWebApplicationContext() {

    // 获取 rootContext,感兴趣可以见博客中 spring bean lifecycle 部分
    WebApplicationContext rootContext =
        WebApplicationContextUtils.getWebApplicationContext(getServletContext());
    WebApplicationContext wac = null;

    // 如果已经通过构造方法设置了 webApplicationContext
    if (this.webApplicationContext != null) {
        // A context instance was injected at construction time -> use it
        wac = this.webApplicationContext;
        if (wac instanceof ConfigurableWebApplicationContext) {
            ConfigurableWebApplicationContext cwac = (ConfigurableWebApplicationContext) wac;
            if (!cwac.isActive()) {
                // The context has not yet been refreshed -> provide services such as
                // setting the parent context, setting the application context id, etc
                if (cwac.getParent() == null) {
                    // The context instance was injected without an explicit parent -> set
                    // the root application context (if any; may be null) as the parent
                    cwac.setParent(rootContext);
                }
                configureAndRefreshWebApplicationContext(cwac);
            }
        }
    }
    if (wac == null) {
       	// 当 webApplicationContext 已经存在 ServletContext 中时,通过配置在 Servlet 中的 contextAttribite 参数获取
        wac = findWebApplicationContext();
    }
    if (wac == null) {
        // 如果 webApplicationContext 还没有创建,就创建一个
        wac = createWebApplicationContext(rootContext);
    }

    if (!this.refreshEventReceived) {
        // 当 ContextRefreshedEvent 事件没有触发时调用此方法,模板方法,可以在子类重写
        synchronized (this.onRefreshMonitor) {
            onRefresh(wac);
        }
    }

    if (this.publishContext) {
        // 将 ApplicationContext 保存到 ServletContext 中
        String attrName = getServletContextAttributeName();
        getServletContext().setAttribute(attrName, wac);
    }

    return wac;
}
initWebApplicationContext 方法一共做了三件事:
- 获取 spring 的根容器 rootContext
- 设置 webApplicationContext 并根据情况调用 onRefresh 方法
- 将 webApplicationContext 设置到 ServletContext 中
获取 spring 的根容器 rootContext
获取根容器的理由是,默认情况下 spring 会将自己的容器设置成 ServletContext 的属性,默认根容器的 key 是 org.springframework.web.context.WebApplicationContext.ROOT,定义在 org.springframework.web.context.WebApplicationContext 中。
String ROOT_WEB_APPLICATION_CONTEXT_ATTRIBUTE = WebApplicationContext.class.getName() + ".ROOT";所以获取根容器只需要调用 ServletContext 的 getAttribute 就可以了
ServletContext#getAttribute("org.springframework.web.context.WebApplicationContext.ROOT")设置 webApplicationContext 并根据情况调用 onRefresh 方法
设置 webApplicationContext 一共有三种方法:
- 第一种方法是在构造方法中传递 webApplicationContext 参数,这时只需要对其进行一些设置即可
- 这种方法主要用于 Servlet3.0 以后的环境中,Servlet3.0 之后可以在程序中使用 ServletContext.addServlet 方式注册 Servlet,这时就可以在新建 FrameworkServlet 和其子类的时候通过构造方法传递已经准备好的 webApplicationContext
- 第二种方法是 webApplicationContext 已经在 ServletContext 中了。
- 这时只需要在配置 Servlet 的时候将 ServletContext 中的 webApplicationContext 的 name 配置到 contextAttribute 属性就可以了,比如,在 ServletContext 中有个叫 testContext 的 webApplicationContext,可以这样将它配置到 Spring MVC 中:
<!-- web.xml -->
<servlet>
    <servlet-name>springmvc</servlet-name>
    <servlet-class>org.springframework.web.servlet.DispatcherServlet</servlet-class>
    <init-param>
        <param-name>contextAttribute</param-name>
        <param-value>testContext</param-value>
    </init-param>
    <load-on-startup>1</load-on-startup>
</servlet>- 第三种方法是前面两种方式都无效的情况下自己创建一个。正常情况下就是使用的这种方式。
- 创建过程在 createWebApplicationContext 方法中,createWebApplicationContext 内部又调用了 configureAndRefreshWebApplicationContext 方法,代码如下:
// org.springframework.web.servlet.FrameworkServlet

protected WebApplicationContext createWebApplicationContext(@Nullable ApplicationContext parent) {
    // 获取创建类型
    Class<?> contextClass = getContextClass();
    // 检查创建类型
    if (!ConfigurableWebApplicationContext.class.isAssignableFrom(contextClass)) {
        throw new ApplicationContextException(
            "Fatal initialization error in servlet with name '" + getServletName() +
            "': custom WebApplicationContext class [" + contextClass.getName() +
            "] is not of type ConfigurableWebApplicationContext");
    }
    // 具体创建
    ConfigurableWebApplicationContext wac =
        (ConfigurableWebApplicationContext) BeanUtils.instantiateClass(contextClass);

    wac.setEnvironment(getEnvironment());
    wac.setParent(parent);
    String configLocation = getContextConfigLocation();
    if (configLocation != null) {
        // 将设置的 contextConfigLocation 参数传递给 wac,默认传入 WEB-INFO/[ServletName]-Servlet.xml
        wac.setConfigLocation(configLocation);
    }

    configureAndRefreshWebApplicationContext(wac);

    return wac;
}

protected void configureAndRefreshWebApplicationContext(ConfigurableWebApplicationContext wac) {
    if (ObjectUtils.identityToString(wac).equals(wac.getId())) {
        // The application context id is still set to its original default value
        // -> assign a more useful id based on available information
        if (this.contextId != null) {
            wac.setId(this.contextId);
        }
        else {
            // Generate default id...
            wac.setId(ConfigurableWebApplicationContext.APPLICATION_CONTEXT_ID_PREFIX +
                      ObjectUtils.getDisplayString(getServletContext().getContextPath()) + '/' + getServletName());
        }
    }

    wac.setServletContext(getServletContext());
    wac.setServletConfig(getServletConfig());
    wac.setNamespace(getNamespace());
    // 添加监听 ContextRefreshedEvent 的监听器
    wac.addApplicationListener(new SourceFilteringListener(wac, new ContextRefreshListener()));

    // The wac environment's #initPropertySources will be called in any case when the context
    // is refreshed; do it eagerly here to ensure servlet property sources are in place for
    // use in any post-processing or initialization that occurs below prior to #refresh
    ConfigurableEnvironment env = wac.getEnvironment();
    if (env instanceof ConfigurableWebEnvironment) {
        ((ConfigurableWebEnvironment) env).initPropertySources(getServletContext(), getServletConfig());
    }

    postProcessWebApplicationContext(wac);
    applyInitializers(wac);
    wac.refresh();
}
这里首先调用 getContextClass 方法获取要创建的类型,它可以通过 contextClass 属性来设置到 Servlet 中,默认使用 org.springframework.web.context.support.XmlWebApplicationContext。
然后检查属不属于 ConfigrueWebApplicationContext 类型,如果不属于就抛出异常。接下来通过 BeanUtils.instantiateClass(contextClass); 进行创建,创建后将设置的 contextConfigLocation 传入,如果没有设置,默认传入 WEB-INFO/[ServletName]-Servlet.xml,然后进行配置。
需要说明的是,在 configureAndRefreshWebApplicationContext 方法中给 wac 添加了监听器:
wac.addApplicationListener(new SourceFilteringListener(wac, new ContextRefreshListener()));
SourceFilteringListener 可以根据传入的参数进行选择,所以实际监听的是 ContextRefreshListener 所监听的事件。
ContextRefreshListener 是 FrameworkServlet 的内部类,监听 ContextRefreshedEvent 事件,当接收到消息时调用 FrameworkServlet 的 onApplicationEvent 方法,在 onApplicationEvent 方法中会调用一次 onRefresh 方法,并将 refreshEventReceived 标志设置为 true,表示已经 refresh 过,代码如下:
// org.springframework.web.servlet.FrameworkServlet

private class ContextRefreshListener implements ApplicationListener<ContextRefreshedEvent> {

    @Override
    public void onApplicationEvent(ContextRefreshedEvent event) {
        FrameworkServlet.this.onApplicationEvent(event);
    }
}

public void onApplicationEvent(ContextRefreshedEvent event) {
    this.refreshEventReceived = true;
    synchronized (this.onRefreshMonitor) {
        onRefresh(event.getApplicationContext());
    }
}
再回到 initWebApplicationContext 方法,可以看到后面会根据 refreshEventReceived 标志来判断是否要运行 onRefresh。
// org.springframework.web.servlet.FrameworkServlet#initWebApplicationContext

if (!this.refreshEventReceived) {
    // Either the context is not a ConfigurableApplicationContext with refresh
    // support or the context injected at construction time had already been
    // refreshed -> trigger initial onRefresh manually here.
    synchronized (this.onRefreshMonitor) {
        onRefresh(wac);
    }
}

// 模板方法
protected void onRefresh(ApplicationContext context) {
    // For subclasses: do nothing by default.
}
当使用第三种方式初始化时已经 refresh,所以就不需要再调用 onRefresh 方法。
同样再第一种方式中也调用了 configureAndRefreshWebApplicationContext 方法,也 refresh 过,所以只有第二种方式初始化 webApplicationContext 的时候才会在这里调用 onRefresh 方法。
不过不管用哪种方式调用,onRefresh 最终肯定会而且只会调用一次,而且 DispatcherServlet 正是通过重写这个模板方法来实现初始化的。
将 webApplicationContext 设置到 ServletContext 中
最后会根据 publishContext 标志判断是否将创建出来的 webApplicationContext 设置到 ServletContext 的属性中,publishContext 标志可以在配置 Servlet 时通过 ini-param 参数进行设置,HttpServletBean 初始化时会将其设置到 publishContext 参数。
之所以将创建出来的 webApplicationContext 设置到 ServletContext 的属性中,主要是为了方便获取,在前面获取 RootApplicationContext 的时候已经介绍过了。
(3)总结
前面介绍了配置 Servlet 时可以设置的一些初始化参数,总结如下:
- contextAttribute:在 ServletContext 属性中,要用作 WebApplicationContext 的属性名称
- contextClass:创建 WebApplicationContext 的类型
- contextConfigLocation:Spring MVC 配置文件的位置
- publishContext:是否将 WebApplicationContext 设置到 ServletContext 的属性
4、DispatcherServlet
(1)initStrategies 策略方法初始化
onRefresh 方法是 DispatcherServlet 的入口方法。onRefresh 中简单的调用了 initStrateies,在 initStrategies 中调用了 9 个初始化方法:
// org.springframework.web.servlet.DispatcherServlet

@Override
protected void onRefresh(ApplicationContext context) {
    initStrategies(context);
}

// 这 9 个方法都是私有方法,策略方法是 initStrategies,如果未来需要更换初始化方法,可以让子类重写 initStrategies 方法
protected void initStrategies(ApplicationContext context) {
    initMultipartResolver(context);
    initLocaleResolver(context);
    initThemeResolver(context);
    initHandlerMappings(context);
    initHandlerAdapters(context);
    initHandlerExceptionResolvers(context);
    initRequestToViewNameTranslator(context);
    initViewResolvers(context);
    initFlashMapManager(context);
}
这里有个疑问,为什么不把 initStrategies 的具体实现直接写到 onRefresh 中呢?initStrategies 方法是不是冗余了?
其实这主要是分层的原因,onRefresh 是用来刷新容器的,initStrategies 用来初始化一些策略组件。如果把 initStrategies 里面的代码直接写到 onRefresh 里面,对于程序的运行也没有影响,不过这样一来,如果在 onRefresh 中想再添加别的功能,就会没有将其单独写在一个方法里逻辑清晰,不过这并不是最重要的,更重要的是,如果在别的地方需要调用 initStrategies 方法(如需要修改一些策略后进行热部署),但 initStrategies 没独立出来,就只能调用 onRefresh,那样在 onRefresh 增加了新的功能时就比较麻烦。另外单独将 initStrategies 写出来还可以被子类覆盖,使用新的模式进行初始化。
(2)浅析 LocaleResolver 初始化
initStrategies 的具体内容非常简单,就是初始化的 9 个组件,下面以 LocaleResolver 为例:
// org.springframework.web.servlet.DispatcherServlet#initLocaleResolver

private void initLocaleResolver(ApplicationContext context) {
    try {
        // 在 context 中获取
        this.localeResolver = context.getBean(LOCALE_RESOLVER_BEAN_NAME, LocaleResolver.class);
        if (logger.isTraceEnabled()) {
            logger.trace("Detected " + this.localeResolver);
        }
        else if (logger.isDebugEnabled()) {
            logger.debug("Detected " + this.localeResolver.getClass().getSimpleName());
        }
    }
    catch (NoSuchBeanDefinitionException ex) {
        // 使用默认策略
        this.localeResolver = getDefaultStrategy(context, LocaleResolver.class);
        if (logger.isTraceEnabled()) {
            logger.trace("No LocaleResolver '" + LOCALE_RESOLVER_BEAN_NAME +
                         "': using default [" + this.localeResolver.getClass().getSimpleName() + "]");
        }
    }
}
初始化分为两步:
- 首先通过 context.getBean 在容器里面按注册时的名称或类型(这里指 “localeResolver” 名称或者 LocaleResolver.class 类型)进行查找,所以在 Spring MVC 的配置文件中只需要配置相应类型的组件,容器就可以自动找到。如果找不到就调用 getDefaultStrategy 按照类型获取默认的组件。需要注意的是,这里的 context 指的是 FrameworkServlet 中创建的 WebApplicationContext,而不是 ServletContext。
下面介绍 getDefaultStrategy 是怎样获取默认组件的:
// org.springframework.web.servlet.DispatcherServlet

protected <T> T getDefaultStrategy(ApplicationContext context, Class<T> strategyInterface) {
    List<T> strategies = getDefaultStrategies(context, strategyInterface);
    if (strategies.size() != 1) {
        throw new BeanInitializationException(
            "DispatcherServlet needs exactly 1 strategy for interface [" + strategyInterface.getName() + "]");
    }
    return strategies.get(0);
}

protected <T> List<T> getDefaultStrategies(ApplicationContext context, Class<T> strategyInterface) {

    // 首先从配置文件中获取所有默认的策略
    if (defaultStrategies == null) {
        try {
            // 读取名称为 DispatcherServlet.properties 的配置文件,该配置文件不允许应用开发者自定义
            ClassPathResource resource = new ClassPathResource(DEFAULT_STRATEGIES_PATH, DispatcherServlet.class);
            defaultStrategies = PropertiesLoaderUtils.loadProperties(resource);
        }
        catch (IOException ex) {
            throw new IllegalStateException("Could not load '" + DEFAULT_STRATEGIES_PATH + "': " + ex.getMessage());
        }
    }

    String key = strategyInterface.getName();
    // 从 defaultStrategies 中获取所需策略的类型
    String value = defaultStrategies.getProperty(key);
    if (value != null) {
        // 如果又多个值,以逗号分割为数组
        String[] classNames = StringUtils.commaDelimitedListToStringArray(value);
        List<T> strategies = new ArrayList<>(classNames.length);
        // 按获取到的类型初始化策略
        for (String className : classNames) {
            try {
                Class<?> clazz = ClassUtils.forName(className, DispatcherServlet.class.getClassLoader());
                Object strategy = createDefaultStrategy(context, clazz);
                strategies.add((T) strategy);
            }
            catch (ClassNotFoundException ex) {
                throw new BeanInitializationException(
                    "Could not find DispatcherServlet's default strategy class [" + className +
                    "] for interface [" + key + "]", ex);
            }
            catch (LinkageError err) {
                throw new BeanInitializationException(
                    "Unresolvable class definition for DispatcherServlet's default strategy class [" +
                    className + "] for interface [" + key + "]", err);
            }
        }
        return strategies;
    }
    else {
        return Collections.emptyList();
    }
}
可以看到 getDefaultStrategy 中调用了 getDefaultStrategies,后者返回的是 List,这是因为 HandlerMapping 等组件可以有多个,所以定义了 getDefaultStrategies 方法,getDefaultStrategy 直接调用了 getDefaultStrategies 方法,并返回返回值的第一个结果。
getDefaultStrategies 中实际执行创建的方法是 ClassUtils.forName,它需要的参数是 className,所以最重要的是看 className 是怎么来的,找到了 className 的来源,也就可以理解默认初始化的方式。
className 来自 classNames,classNames 又来自 value,而 value 来自 defaultStrategies.getProperty(key)。所以关键点又在 defaultStrategies 中,defaultStrategies 是一个静态属性,在 getDefaultStrategies 方法的最上面初始化的:
if (defaultStrategies == null) {
    try {
        // 读取名称为 DispatcherServlet.properties 的配置文件,该配置文件不允许应用开发者自定义
        ClassPathResource resource = new ClassPathResource(DEFAULT_STRATEGIES_PATH, DispatcherServlet.class);
        defaultStrategies = PropertiesLoaderUtils.loadProperties(resource);
    }
    catch (IOException ex) {
        throw new IllegalStateException("Could not load '" + DEFAULT_STRATEGIES_PATH + "': " + ex.getMessage());
    }
}
该静态属性实质上是从 DEFAULT_STRATEGIES_PATH 中读取出来的,DEFAULT_STRATEGIES_PATH 的值是 DispatcherServlet.properties。
(3)DispatcherServlet.properties
所以 defaultStrategies 里面存放的是 org.springframework.web.DispatcherServlet.properties 里面定义的键值对:
# Default implementation classes for DispatcherServlet's strategy interfaces.
# Used as fallback when no matching beans are found in the DispatcherServlet context.
# Not meant to be customized by application developers.

org.springframework.web.servlet.LocaleResolver=org.springframework.web.servlet.i18n.AcceptHeaderLocaleResolver

org.springframework.web.servlet.ThemeResolver=org.springframework.web.servlet.theme.FixedThemeResolver

org.springframework.web.servlet.HandlerMapping=org.springframework.web.servlet.handler.BeanNameUrlHandlerMapping,\
	org.springframework.web.servlet.mvc.method.annotation.RequestMappingHandlerMapping,\
	org.springframework.web.servlet.function.support.RouterFunctionMapping

org.springframework.web.servlet.HandlerAdapter=org.springframework.web.servlet.mvc.HttpRequestHandlerAdapter,\
	org.springframework.web.servlet.mvc.SimpleControllerHandlerAdapter,\
	org.springframework.web.servlet.mvc.method.annotation.RequestMappingHandlerAdapter,\
	org.springframework.web.servlet.function.support.HandlerFunctionAdapter


org.springframework.web.servlet.HandlerExceptionResolver=org.springframework.web.servlet.mvc.method.annotation.ExceptionHandlerExceptionResolver,\
	org.springframework.web.servlet.mvc.annotation.ResponseStatusExceptionResolver,\
	org.springframework.web.servlet.mvc.support.DefaultHandlerExceptionResolver

org.springframework.web.servlet.RequestToViewNameTranslator=org.springframework.web.servlet.view.DefaultRequestToViewNameTranslator

org.springframework.web.servlet.ViewResolver=org.springframework.web.servlet.view.InternalResourceViewResolver

org.springframework.web.servlet.FlashMapManager=org.springframework.web.servlet.support.SessionFlashMapManager
可以看到,里面确实定义了不同组件的类型,一共定义了 8 个组件,处理上传组件的 MultipartResolver 是没有默认配置的,这也很容易理解,并不是每个应用都需要上传功能,即使需要上传也不一定就要使用 MultipartResolver,所以 MultipartResolver 不需要默认配置。另外 HandlerMapping、HandlerAdapter 和 HandlerExceptionResolver 都配置了多个,其实 ViewResolver 也可以有多个,只是默认的配置只有一个。
这里需要注意两个问题:
- 首先默认配置并不是最优配置,也不是 spring 的推荐配置,只是在没有配置的时候可以有个默认值,不至于空着。
- 另外需要注意的一点是:默认配置都是在相应类型没有配置的时候才会使用,如当使用
<mvc:annotation-driven/>后,并不会全部使用默认配置。因为它配置了 HandlerMapping、HandlerAdapter 和 HandlerExceptionResolver,而且还做了许多其他的工作,具体内容见:org.springframework.scheduling.config.AnnotationDrivenBeanDefinitionParser
总结:DispatcherServlet 的创建过程主要是对 9 大组件进行初始化,具体每个组件的作用之后用到的时候再分析。
(4)解析命名空间配置
Q:在 spring 的 xml 文件中通过命名空间配置的标签是怎么解析的?
我们都知道,在 spring 的 xml 配置文件中可以使用很多命名空间来配置,命名空间配置的内容具体是怎么解析的呢?对于一个具体的命名空间,spring 是怎么找到解析它的类的呢?
A:
其实在 spring 中是把解析标签的类都放到了相应的 META-INF 目录下的 spring.handlers 文件中,然后从那里面找,比如,mvc 命名空间的解析设置:
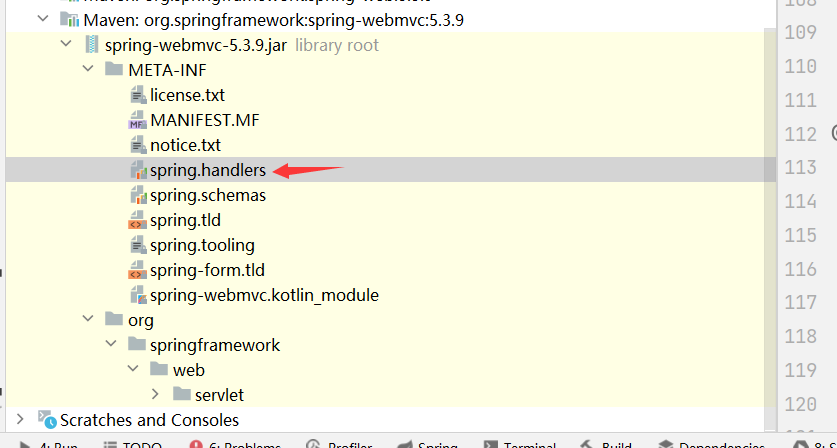
内容为:
http\://www.springframework.org/schema/mvc=org.springframework.web.servlet.config.MvcNamespaceHandler这样就告诉我们,处理 mvc 这个命名空间的配置需要使用 MvcNamespaceHandler(在其内部将 mvc:annotation-dirven 的解析交给 org.springframework.scheduling.config.AnnotationDrivenBeanDefinitionParser)。
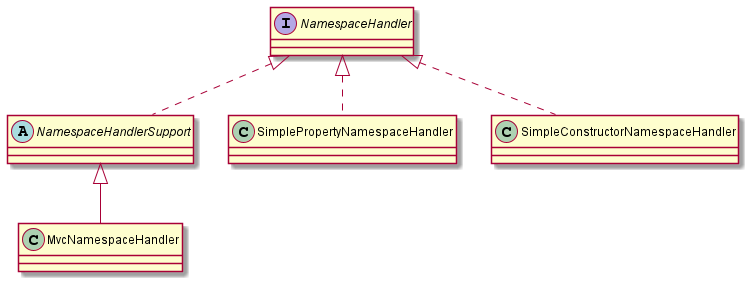
解析配置的接口是 org.springframework.beans.factory.xml.NamespaceHandler,它的继承结构如下:
注:NamespaceHandlerSupport 的子类很多(大概10个),下图只给出了 MvcNamespaceHandler
Namespacehandler 里一共定义了三个方法:init、parse 和 decorate。
- init 用于初始化自己的
- parse 用于将配置的标签转换为 spring 所需要的 BeanDefinition
- deocrate 是装饰的意思,该方法的作用是对所在的 BeanDefinition 进行一些修改,用得比较少
// org.springframework.beans.factory.xml.NamespaceHandler
public interface NamespaceHandler {

	void init();

	@Nullable
	BeanDefinition parse(Element element, ParserContext parserContext);

	@Nullable
	BeanDefinitionHolder decorate(Node source, BeanDefinitionHolder definition, ParserContext parserContext);
}
NamespaceHandler 的实现类主要有三个:NamespaceHandlerSupport、SimpleConstructorNamespaceHandler、SimplePropertyNamespaceHandler。
- 其中 NamespaceHandlerSupport 是 NamespaceHandler 的默认实现,一般的 NamespaceHandler 都会继承自这个类(当然也有特殊情况,SpringSecurity 的 SecurityNamespaceHandler 是直接实现的 NamespaceHandler 接口)
- SimpleConstructorNamespaceHandler 用于统一对通过
c:配置的构造方法进行解析 - SimplePropertyNamespaceHandler 用于统一对通过
p:配置的参数进行解析
NamespaceHandlerSupport 没有做具体的解析工作,而是定义了三个处理器:parsers、decorators、attributeDecorators,分别用于处理解析工作、处理标签类型、处理属性类型的装饰。
接口的 parse 和 decorate 方法的执行方式是先找到对应的处理器,然后进行处理。
具体的处理器由子类实现,然后注册到 NamespaceHandlerSupport 上面,所以要定义一个命名空间的解析器,只需要在 init 中定义相应的 parsers、decorators、attributeDecorators 并注册到 NamespaceHandlerSupport 上面。
下面是 NamespaceHandlerSupport 的代码及解析 mvc 命名空间的 MvcNamespaceHandler 代码:
// org.springframework.beans.factory.xml.NamespaceHandlerSupport
public abstract class NamespaceHandlerSupport implements NamespaceHandler {

	private final Map<String, BeanDefinitionParser> parsers = new HashMap<>();

	private final Map<String, BeanDefinitionDecorator> decorators = new HashMap<>();

	private final Map<String, BeanDefinitionDecorator> attributeDecorators = new HashMap<>();

	@Override
	@Nullable
	public BeanDefinition parse(Element element, ParserContext parserContext) {
		BeanDefinitionParser parser = findParserForElement(element, parserContext);
		return (parser != null ? parser.parse(element, parserContext) : null);
	}

	@Nullable
	private BeanDefinitionParser findParserForElement(Element element, ParserContext parserContext) {
		String localName = parserContext.getDelegate().getLocalName(element);
		BeanDefinitionParser parser = this.parsers.get(localName);
		if (parser == null) {
			parserContext.getReaderContext().fatal(
					"Cannot locate BeanDefinitionParser for element [" + localName + "]", element);
		}
		return parser;
	}

	@Override
	@Nullable
	public BeanDefinitionHolder decorate(
			Node node, BeanDefinitionHolder definition, ParserContext parserContext) {

		BeanDefinitionDecorator decorator = findDecoratorForNode(node, parserContext);
		return (decorator != null ? decorator.decorate(node, definition, parserContext) : null);
	}

	@Nullable
	private BeanDefinitionDecorator findDecoratorForNode(Node node, ParserContext parserContext) {
		BeanDefinitionDecorator decorator = null;
		String localName = parserContext.getDelegate().getLocalName(node);
        // 先判断是标签还是属性,然后再调用相关方法处理
		if (node instanceof Element) {
			decorator = this.decorators.get(localName);
		}
		else if (node instanceof Attr) {
			decorator = this.attributeDecorators.get(localName);
		}
		else {
			parserContext.getReaderContext().fatal(
					"Cannot decorate based on Nodes of type [" + node.getClass().getName() + "]", node);
		}
		if (decorator == null) {
			parserContext.getReaderContext().fatal("Cannot locate BeanDefinitionDecorator for " +
					(node instanceof Element ? "element" : "attribute") + " [" + localName + "]", node);
		}
		return decorator;
	}

	protected final void registerBeanDefinitionParser(String elementName, BeanDefinitionParser parser) {
		this.parsers.put(elementName, parser);
	}

	protected final void registerBeanDefinitionDecorator(String elementName, BeanDefinitionDecorator dec) {
		this.decorators.put(elementName, dec);
	}

	protected final void registerBeanDefinitionDecoratorForAttribute(String attrName, BeanDefinitionDecorator dec) {
		this.attributeDecorators.put(attrName, dec);
	}
}
下面是 mvc 命名空间的解析器:
// org.springframework.web.servlet.config.MvcNamespaceHandler

public class MvcNamespaceHandler extends NamespaceHandlerSupport {

	@Override
	public void init() {
		registerBeanDefinitionParser("annotation-driven", new AnnotationDrivenBeanDefinitionParser());
		registerBeanDefinitionParser("default-servlet-handler", new DefaultServletHandlerBeanDefinitionParser());
		registerBeanDefinitionParser("interceptors", new InterceptorsBeanDefinitionParser());
		registerBeanDefinitionParser("resources", new ResourcesBeanDefinitionParser());
		registerBeanDefinitionParser("view-controller", new ViewControllerBeanDefinitionParser());
		registerBeanDefinitionParser("redirect-view-controller", new ViewControllerBeanDefinitionParser());
		registerBeanDefinitionParser("status-controller", new ViewControllerBeanDefinitionParser());
		registerBeanDefinitionParser("view-resolvers", new ViewResolversBeanDefinitionParser());
		registerBeanDefinitionParser("tiles-configurer", new TilesConfigurerBeanDefinitionParser());
		registerBeanDefinitionParser("freemarker-configurer", new FreeMarkerConfigurerBeanDefinitionParser());
		registerBeanDefinitionParser("groovy-configurer", new GroovyMarkupConfigurerBeanDefinitionParser());
		registerBeanDefinitionParser("script-template-configurer", new ScriptTemplateConfigurerBeanDefinitionParser());
		registerBeanDefinitionParser("cors", new CorsBeanDefinitionParser());
	}
}
在这个类中可以看到 mvc 命名空间使用到的所有解析器,其中解析 “annotation-driven” 的是 AnnotationDrivenBeanDefinitionParser。
5、小结
前面主要分析了 Spring MVC 自身的创建过程,Spring MVC 中 Servlet 一共有三个层次,分别是:
- HttpServletBean
- 直接继承自 Java 的 HttpServlet,其作用是将 Servlet 配置的参数设置到相应的属性(借助了 BeanWrapper 这个 Spring 提供的工具接口。)
- FrameworkServlet
- 初始化了 WebApplicationContext
- 三种初始化方式,过程中使用了 Servlet 中配置的一些参数
- 初始化了 WebApplicationContext
- DispatcherServlet
- 初始化了自身的 9 个组件
整体结构非常简单 —— 分三个层次做了三件事,但是具体实现过程还是有点复杂的。
这其实也是 spring 的特点:
- 结构简单,实现复杂。
- 结构简单主要是顶层设计好,实现复杂主要是因为提供的功能比较多,可配置的地方也非常多。
当然,正因为实现复杂,才让 Spring MVC 使用起来更加灵活。