Spring MVC 处理请求过程分析
前面分析了 Spring MVC 的创建过程,现在分析 Spring MVC 是如何处理请求的。
分两步:
- 首先分析 HttpServletBean、FrameworkServlet 和 DispatcherServlet 这三个 Servlet 的处理过程,这是为了分析从 Servlet 容器将请求交给 Spring MVC 一直到 DispatcherServlet 具体处理请求之前都做了些什么
- 然后重点分析 Spring MVC 中最核心的处理方法 doDispatch 的结构
1、HttpServletBean
HttpServletBean 主要参于了创建工作,并没有涉及请求的处理。
2、FrameworkServlet
之前分析过 Servlet 的处理过程:
- 首先是 Servlet 接口的 service 方法开始
- 然后在 HttpServlet 的 service 方法中根据请求的类型不同将请求路由到了 doGet、doHead、doPost、doPut、doDelete、doOptions 和 doTrace 七个方法,并且做了 doHead、doOptions 和 doTrace 的默认实现,其中 doHead 调用 doGet,然后返回只有 header 没有 body 的 response
在 FrameworkServlet 中重写了 service、doGet、doPost、doPut、doDelete、doOptions、doTrace 方法(除了 doHead 的所有处理请求的方法)。
在 service 方法中增加了对 PATCH 类型请求的处理,其他类型的请求直接交给了父类进行处理;
doOptions 和 doTrace 方法可以通过设置
dispatchOptionsRequest和dispatchTraceRequest参数决定是自己处理还是交给父类处理(默认都是交给父类处理,doOptions 会在父类的处理结果中增加 PATCH 类型);doGet、doPost、doPut 和 doDelete 都是自己处理。
所有需要自己处理的请求都交给了 processRequest 方法进行统一处理。
下面看一下 service 和 doGet 的代码,其他的需要自己处理的都和 doGet 类似:
// org.springframework.web.servlet.FrameworkServlet

@Override
protected void service(HttpServletRequest request, HttpServletResponse response)
    throws ServletException, IOException {

    HttpMethod httpMethod = HttpMethod.resolve(request.getMethod());
    if (httpMethod == HttpMethod.PATCH || httpMethod == null) {
        processRequest(request, response);
    }
    else {
        super.service(request, response);
    }
}

@Override
protected final void doGet(HttpServletRequest request, HttpServletResponse response)
    throws ServletException, IOException {

    processRequest(request, response);
}
可以发现,这里所做的事情和 HttpServlet 里将不同类型的请求路由到不同方法进行处理的思路正好相反,这里又将所有的请求合并到了 processRequest 方法。当然并不是说 Spring MVC 中就不对 request 的类型进行分类,而全部执行相同的操作,恰恰相反,Spring MVC 中对不同类型的请求的支持非常好,不过它是通过另外一种方式进行处理的,它将不同类型的请求用不同的 Handler 进行处理,后面再详细介绍。
Q:直接覆盖 service 方法不就可以了吗?
HttpServlet 的 service 方法是将请求路由到不同的方法,如果在 service 中不再调用 super.service(),而是直接将请求交给 processRequest 处理不是更简单吗?
从现在的结构看确实如此,不过那么做存在一些问题。比如,我们为了某种特殊的需求需要在 Post 请求处理前对 request 做一些处理,这时可能会新建一个继承自 DispatcherServlet 的类,然后覆盖 doPost 方法,在里面先对 request 做处理,然后再调用 supper.doPost(),但是父类(指 FrameworkServlet)根本没调用 doPost,这时候就会出现问题。
虽然这个问题的解决方法也很简单,但是按正常的逻辑,调用 doPost 应该可以完成才合理,而且一般情况下开发者并不需要对 Spring MVC 内部的结果非常了解,所以 Spring MVC 的这种做法看起来虽然有点笨拙但还是有必要的。
(1)processRequest 方法
下面看看 processRequest 方法,processRequest 是 FrameworkServlet 类在处理请求中最核心的方法:
// org.springframework.web.servlet.FrameworkServlet

protected final void processRequest(HttpServletRequest request, HttpServletResponse response)
    throws ServletException, IOException {

    long startTime = System.currentTimeMillis();
    Throwable failureCause = null;

    // 获取 LocaleContextHolder 中原来保存的 LocaleContext
    LocaleContext previousLocaleContext = LocaleContextHolder.getLocaleContext();
    // 获取当前请求的 LocaleContext
    LocaleContext localeContext = buildLocaleContext(request);
	// 获取 RequestContextHolder 中原来保存的 RequestAttributes
    RequestAttributes previousAttributes = RequestContextHolder.getRequestAttributes();
    // 获取当前请求的 ServletRequestAttributes
    ServletRequestAttributes requestAttributes = buildRequestAttributes(request, response, previousAttributes);

    WebAsyncManager asyncManager = WebAsyncUtils.getAsyncManager(request);
    asyncManager.registerCallableInterceptor(FrameworkServlet.class.getName(), new RequestBindingInterceptor());
	// 将当前请求的 LocaleContext 和 ServletRequestAttributes 设置到 LocaleContextHolder 和 RequestContextHolder
    initContextHolders(request, localeContext, requestAttributes);

    try {
        // 实际处理请求入口
        doService(request, response);
    }
    catch (ServletException | IOException ex) {
        failureCause = ex;
        throw ex;
    }
    catch (Throwable ex) {
        failureCause = ex;
        throw new NestedServletException("Request processing failed", ex);
    }

    finally {
        // 恢复原来的 LocaleContext 和 ServletRequestAttributes 到 LocaleContextHolder 和 RequestContextHolder 中
        resetContextHolders(request, previousLocaleContext, previousAttributes);
        if (requestAttributes != null) {
            requestAttributes.requestCompleted();
        }
        logResult(request, response, failureCause, asyncManager);
        // 发布 ServletRequestHandledEvent
        publishRequestHandledEvent(request, response, startTime, failureCause);
    }
}
processRequest 方法中的核心语句是 doService(request, response),这是一个模板方法,在 DispatcherServlet 中具体实现。
在 doService 之前还做了一些事情(装饰模式,这里是换了个装饰品):
- 首先获取了 LocaleContextHolder 和 RequestContextHolder 中原来保存的 LocaleContext 和 RequestAttributes 并设置到了 previousLocaleContext 和 proviousAttributes 临时属性
- 然后调用 buildLocaleContext 和 buildRequestAttributes 方法获取当前请求的 LocaleContext 和 RequestAttributes,并通过 initContextHolders 方法将它们设置到 LocaleContextHolder 和 RequestContextHolder 中(处理完请求后再恢复到原来的值)
- 接着使用 request 拿到异步处理管理器并设置了拦截器,做完这些后执行了 doService 方法
- 最后(finally 中)通过 resetContextHolders 方法将原来的 previousLocaleContext 和 proviousAttributes 恢复到 LocaleContextHolder 和 RequestContextHolder 中,并调用 publishRequestHandledEvent 方法发布了一个 ServletRequestHandledEvent 类型的消息。
这里涉及到了异步请求相关的内容,之后再分析。除了异步请求和调用 doService 方法具体处理请求,processRequest 自己主要做了两件事情:
- 对 LocaleContext 和 RequestAttributes 的设置和恢复
- 处理完后发布 ServletRequestHandledEvent 消息
(2)LocaleContext 和 RequestAttributes
简介
LocaleContext 中存放着 Locale(也就是本地化消息,如 zh-cn 等等),RequestAttrributes 是 spring 的一个接口,通过它可以 get/set/removeAttribute,根据 scope 参数判断操作 request 还是 session。这里具体使用的是 ServletRequestAttributes 类,在 ServletRequestAttributes 里还封装了 request、response 和 session,而且都提供了 get 方法,可以直接获取。
下面看看 ServletRequestAttributes 里的 setAttribute 的代码(get/remove 都差不多):
// org.springframework.web.context.request.ServletRequestAttributes

@Override
public void setAttribute(String name, Object value, int scope) {
    if (scope == SCOPE_REQUEST) {
        if (!isRequestActive()) {
            throw new IllegalStateException(
                "Cannot set request attribute - request is not active anymore!");
        }
        this.request.setAttribute(name, value);
    }
    else {
        HttpSession session = obtainSession();
        this.sessionAttributesToUpdate.remove(name);
        session.setAttribute(name, value);
    }
}
设置属性时可以通过 scope 判断是对 request 还是对 session 进行设置,具体执行就是直接对 request 和 session 操作,sessionAttributesToUpdate 属性会在 SessionAttributeHandler 中用到,暂时先不考虑。
需要注意的是 isRequestActive() 方法,当调用了 ServletRequestAttributes 的 requestCompleted 方法后 requestActive 就会变为 false,执行之前是 true。这个很容易理解,request 执行完了,当然也就不能对它进行操作了。刚刚 processRequest() 方法的 finally 块中就调用了该方法。
总结
- LocaleContext 可以获取 Locale
- RequestAttributes 用于管理 request 和 session 属性。
至于两者的具体用法,就在 LocaleContextHolder 和 RequestContextHolder 中使用。
LocaleContextHolder
LocaleContextHolder 是一个 final 类,并且私有化构造方法,同时里面的其他方法都是 static 的,可以直接调用,而且没有父类也没有子类。也就是说我们不能对其实例化,只能调用其定义的 static 方法。这种工具类的定义方法值得我们学习。
在 LocaleContextHolder 中有两个 static 属性需要注意:
// org.springframework.context.i18n.LocaleContextHolder
private static final ThreadLocal<LocaleContext> localeContextHolder =
    new NamedThreadLocal<>("LocaleContext");

private static final ThreadLocal<LocaleContext> inheritableLocaleContextHolder =
    new NamedInheritableThreadLocal<>("LocaleContext");
两个属性都是 ThreadLocal<LocaleContext> 类型的,LocalContext 之前已经介绍过了,至于 ThreadLocal 也在很多地方用到。
ThreadLocal 的作用及其实现原理
简单来说,ThreadLocal 类型的属性就是每个线程都可以独立保存自己的内容,虽然是同一个属性,但不同的线程用的却是自己独有的一份。
ThreadLocal 内部具体的实现是这样的,首先在 Thread 内部封装了一个 map 用于保存一些值,然后 ThreadLocal 在 get/set 的时候,首先拿到线程自身的那个 map,然后将自己作为 key,所要保存的那个值作为 value,put 进去,这样就将具体的值保存在了每个线程自身上面(而不是 ThreadLocal 里面),所以每个线程之间都会有独立的一份,而不会互相影响。
至于为什么要用 map 而不是 Object,也很容易理解,因为这样每个线程都可以保存不止一个 ThreadLocal 类型的属性。比如,在 LocaleContextHolder 里面有两个 Thread Local:localeContextHolder 和 inheritableLocaleContextHolder,这时就需要示例化两个 ThreadLocal,然后分别作为 key 保存到 Thread 里面,如果别的地方还有使用到 ThreadLocal 的地方,再实例化一个 ThreadLocal,然后将自己作为 key,put 到 Thread 里面。也就是 Thread 的那个 map 的每一个 key-value 都代表着一个 ThreadLocal 类型的参数。
这个 map 属性叫做 threadLocals,它的类型是定义在 ThreadLocal 中的静态类 ThreadLocal.ThreadLocalMap。
// java.lang.Thread

/* ThreadLocal values pertaining to this thread. This map is maintained
 * by the ThreadLocal class. */
ThreadLocal.ThreadLocalMap threadLocals = null;
继续
回到正题,LocaleContextHolder 类里面封装了两个属性 localeContextHolder 和 inheritableLocaleContextHolder,它们都是 LocaleContext,其中第二个可以被子线程继承。
LocaleContextHolder 还提供了 get/set 方法,可以获取和设置 LocaleContext,另外还提供了 get/setLocale 方法,可以直接操作 Locale,当然都是 static 的。
使用起来很方便,比如程序中需要用到 Locale 的时候,首先相当的可能是 request.getLocale(),这是最直接的方法。不过有时候在 service 层需要用到 Locale 的时候,再使用这种方法就不方便的,因为正常来说,service 层没有 request,这时可能就需要再 controller 层将 Locale 拿出来,作为参数再传给 service 层,但重要的是怎么传呢?服务层的代码可能已经通过测试了,如果想把 Locale 作为参数传递过去需要修改接口,修改接口可能会造成很多问题!而有了 LocaleContextHolder 就方便多了,只需要在 service 中直接调用 LocaleContextHolder.getLocale() 就可以了,它是静态方法。
当然,在 Spring MVC 中 Locale 的值并不总是 request.getLocale() 获取到的值,而是采用了非常灵活的机制,后面的 LocaleResolver 中再分析。
java.util.Locale 和地理位置相关的类
RequestContextHolder
RequestContextHolder 也是同样的道理,里面封装了 RequestAttributes,可以 get/set/removeAttribute,而且因为实际封装的是 ServletRequestAttributes(RequestAttributes 类型),所以还可以 getRequest、getResponse、getSession。
这样就可以再任何地方都能方便地获取这些对象了!另外,因为里面封装的其实是对象的引用,所以即使在 doService 方法里面设置的 Attribute,使用 RequestContextHolder 也一样可以获取到。
在 processRequest 方法的 finally 块中执行了 resetContextHolders 方法将原来的 LocaleContext 和 RequestAttributes 又恢复为原来的状态。这是因为在 Servlet 外面可能还会有别的操作,如 Filter(Spring MVC 自己的 HandlerInterceptor 是在 doService 内部的)等等,为了不影响这些操作,所以需要进行恢复。
publishRequestHandledEvent 方法
publishRequestHandledEvent(request, response, startTime, failureCause); 方法用于发布消息。
在该方法内部发布了一个 ServletRequestHandledEvent 消息,代码如下:
// org.springframework.web.servlet.FrameworkServlet

private void publishRequestHandledEvent(HttpServletRequest request, HttpServletResponse response,
                                       long startTime, @Nullable Throwable failureCause) {

    // publishEvents 属性默认为 true,也可以在配置 Servlet 时设置
    if (this.publishEvents && this.webApplicationContext != null) {
        // 无论请求是否执行成功都会执行
        long processingTime = System.currentTimeMillis() - startTime;
        this.webApplicationContext.publishEvent(
            new ServletRequestHandledEvent(this,
                                           request.getRequestURI(), request.getRemoteAddr(),
                                           request.getMethod(), getServletConfig().getServletName(),
                                           WebUtils.getSessionId(request), getUsernameForRequest(request),
                                           processingTime, failureCause, response.getStatus()));
    }
}
当 publishEvents 为 true 时,请求处理结束后会发出这个消息,无论请求处理成功与否都会发布。publishEvents 可以在 web.xml 文件中配置 Spring MVC 的 Servlet 时配置,默认为 true。
我们可以通过监听这个事件来做一些事情,如记录日志。
下面就写一个记录日志的监听器:
import org.apache.commons.logging.Log;
import org.apache.commons.logging.LogFactory;
import org.springframework.context.ApplicationListener;
import org.springframework.stereotype.Component;
import org.springframework.web.context.support.ServletRequestHandledEvent;

@Component
public class ServletRequestHandledEventListener implements ApplicationListener<ServletRequestHandledEvent> {

    final static Log log = LogFactory.getLog("RequestProcessLog");

    @Override
    public void onApplicationEvent(ServletRequestHandledEvent event) {
        log.info(event.getDescription());
    }
}
只需要简单的继承 ApplicationListener,并且把自己要做的事情写到 onApplicationEvent 里面就行了。同时还需要把这个类注册到 Spring 容器中,使用 @Component 注解。
(3)总结
简单回顾一下 FrameworkServlet:
- 首先是在 service 方法里添加了对 PATCH 的处理,并将所有需要自己处理请求都集中到了 processRequest 方法进行统一处理,这和 HttpServlet 里面根据 request 的类型将请求分配到各个不同的方法进行处理的过程正好相反。
- 然后就是 processRequest 方法,在 processRequest 里面主要的处理逻辑交给 doService,这是一个模板方法,在子类具体实现,另外就是对使用当前 request 获取到的 LocaleContext 和 RequestAttributes 进行了保存,以及处理完之后的恢复,在最后发布了 ServletRequestHandledEvent 事件。
3、DispatcherServlet
(1)入口方法 doService
DispatcherServlet 是 Spring MVC 最核心的类,整个处理过程的顶层设计都在这里面。
通过之前的分析可知,DispatcherServlet 里面执行处理的入口方法是 doService,不过 doService 并没有直接进行处理,而是交给了 doDispatch 进行具体的处理,在 doDispatch 处理前 doService 做了一些事情:
- 首先判断是不是 include 请求(这里要提一下请求包含 Include 和 请求转发 Forward,前者是将另一个 Servlet 的请求处理流程包含进来,后者是将请求转发给别的 Servlet 处理),如果是则对 request 的 Attribute 做个快照备份,等 doDispatch 处理完之后(如果不是异步调用且未完成)进行还原,在做完快照后又对 request 设置了一些属性,代码如下:
// org.springframework.web.servlet.DispatcherServlet

@Override
protected void doService(HttpServletRequest request, HttpServletResponse response) throws Exception {
    logRequest(request);

    // 当收到 include 请求时对 request 的 Attribute 做快照备份
    // Keep a snapshot of the request attributes in case of an include,
    // to be able to restore the original attributes after the include.
    Map<String, Object> attributesSnapshot = null;
    if (WebUtils.isIncludeRequest(request)) {
        attributesSnapshot = new HashMap<>();
        Enumeration<?> attrNames = request.getAttributeNames();
        while (attrNames.hasMoreElements()) {
            String attrName = (String) attrNames.nextElement();
            if (this.cleanupAfterInclude || attrName.startsWith(DEFAULT_STRATEGIES_PREFIX)) {
                attributesSnapshot.put(attrName, request.getAttribute(attrName));
            }
        }
    }

    // 给 request 设置一些属性
    // Make framework objects available to handlers and view objects.
    // 下面四个属性之后在 handler 和 view 中需要使用
    request.setAttribute(WEB_APPLICATION_CONTEXT_ATTRIBUTE, getWebApplicationContext());
    request.setAttribute(LOCALE_RESOLVER_ATTRIBUTE, this.localeResolver);
    request.setAttribute(THEME_RESOLVER_ATTRIBUTE, this.themeResolver);
    request.setAttribute(THEME_SOURCE_ATTRIBUTE, getThemeSource());

    if (this.flashMapManager != null) {
        FlashMap inputFlashMap = this.flashMapManager.retrieveAndUpdate(request, response);
        // 下面三个属性都和 flashMap 有关,主要用于 redirect 转发时参数的传递
        if (inputFlashMap != null) {
            request.setAttribute(INPUT_FLASH_MAP_ATTRIBUTE, Collections.unmodifiableMap(inputFlashMap));
        }
        request.setAttribute(OUTPUT_FLASH_MAP_ATTRIBUTE, new FlashMap());
        request.setAttribute(FLASH_MAP_MANAGER_ATTRIBUTE, this.flashMapManager);
    }

    RequestPath previousRequestPath = null;
    if (this.parseRequestPath) {
        previousRequestPath = (RequestPath) request.getAttribute(ServletRequestPathUtils.PATH_ATTRIBUTE);
        ServletRequestPathUtils.parseAndCache(request);
    }

    try {
        // 核心方法
        doDispatch(request, response);
    }
    finally {
        if (!WebAsyncUtils.getAsyncManager(request).isConcurrentHandlingStarted()) {
            // 还原 request 快照的属性
            // Restore the original attribute snapshot, in case of an include.
            if (attributesSnapshot != null) {
                restoreAttributesAfterInclude(request, attributesSnapshot);
            }
        }
        if (this.parseRequestPath) {
            ServletRequestPathUtils.setParsedRequestPath(previousRequestPath, request);
        }
    }
}
对 request 设置的属性中,前面 4 个属性 webApplicationContext、localeResolver、themeResolver 和 themeSource 在之后介绍的 handler 和 view 中需要使用,到时候再做分析。
(2)flashMap
后面三个属性都和 flashMap 相关,主要用于 Redirect 转发时参数的传递,比如,为了避免重复提交表单,可以在 post 请求后 redirect 到一个 get 的请求,这样即使用户刷新也不会有重复提交的问题。不过这里有个问题,前面的 post 请求是提交订单,提交完后 redirect 到一个显示订单的页面,显然在显示订单的页面需要知道订单的一些信息,但 redirect 本身是没有传递参数的功能的,按普通的模式如果想传递参数,就只能将其写入 url 中,但是 url 有长度限制,另外有些场景中我们想传递的参数还不想暴露在 url 里,这时就可以用 flashMap 来传递了,我们只需要在 redirect 之前将需要传递的参数写入 OUTPUT_FLASH_MAP_ATTRIBUTE,如下:(这里使用了前面讲到的 RequestContextHolder)
前台:hello.jsp 和 flash.jsp
<%-- hello.jsp --%>

<form action="${pageContext.request.contextPath}/testFlashMap" method="post">
    <button type="submit">提交</button>
</form>


<%-- flash.jsp --%>

${name}
后台:HelloController.java
// 使用 flashMap 在 redirect 过程中传递参数(不使用 url 传参)
@RequestMapping(value = "/testFlashMap", method = {RequestMethod.POST})
public String testFlash() {

    ((FlashMap) ((ServletRequestAttributes) (RequestContextHolder.getRequestAttributes()))
     .getRequest()
     .getAttribute(DispatcherServlet.OUTPUT_FLASH_MAP_ATTRIBUTE)).put("name", "张三丰");

    return "redirect:showFlash";
}

@RequestMapping(value = "/showFlash", method = RequestMethod.GET)
public String toFlash() {

    // doSomthing...
    return "flash.jsp";
}
这样在 redirect 之后的 handle 中 spring 就会自动将其设置到 model 里(先设置到 INPUT_FLASH_MAP_ATTRIBUTE属性里,然后再放到 model 里)。当然这样操作还是有些麻烦,spring 还给我们提供了更加简单的操作方法,我们只需要在 handler 方法的参数中定义 RedirectAttributes 类型的变量,然后把需要保存的属性设置到里面就行,之后的事情 spring 自动完成。RedirectAttributes 有两种设置参数的方法 addAttribute(key, value) 和 addFlashAttribute(key, value),用第一个方法设置的参数会拼接到 url 中,第二个方法设置的参数就是用刚刚讲的 flashMap 保存的。
比如:
@RequestMapping(value = "/testFlashMap", method = {RequestMethod.POST})
public String testFlash(RedirectAttributes attr) {

    attr.addFlashAttribute("name", "xxx");
    attr.addAttribute("pwd", "xxxxxx");

    return "redirect:showFlash";
}

@RequestMapping(value = "/showFlash", method = RequestMethod.GET)
public String toFlash() {

    // doSomthing...
    return "flash.jsp";
}
(3)传递 redirect 参数
前面讲了三种方法传递 redirect 参数。
- 使用前面讲过的
RequestContextHolder获取到 request,并从其属性中拿到 outputFlashMap,然后将属性放过去,当然 request 可以直接写到参数里让 Spring MVC 给设置进来,前面只是介绍使用 RequestContextHolder 获取 request 的方法 - 通过传入的 attr 参数的
addFlashAttribute方法设置,这样也可以保存到 outputFlashMap中,和第一种方法效果一样 - 通过传入的 attr 参数的
addAttribute方法设置,这样设置的参数不会保存到 FlashMap,而是会凭借到 url 中
从 Request 获取 outputFlashMap 除了直接获取 DispatcherServlet.OUTPUT_FLASH_MAP_ATTRIBUTE 属性,还可以使用 RequestContextUtils 来操作:RequestContextUtils.getOutputFlashMap(request),这样也可以得到 outputFlashMap,其实它内部还是从 Request 的属性获取的。
@RequestMapping(value = "/testFlashMap", method = {RequestMethod.POST})
public String testFlash(HttpServletRequest request) {

    RequestContextUtils.getOutputFlashMap(request).put("name", "李四");

    return "redirect:showFlash";
}
这就是 flashMap 的用法:
inputFlashMap用于保存上次请求中转发过来的属性outputFlashMap用于保存本次请求需要转发的属性FlashMapManager用于管理它们
总结:doService 方法主要对 request 设置了一些属性,如果是 include 请求还会对 request 当前的属性做快照备份,并在处理结束后恢复。最后将请求转发给 doDispatch 方法。
doDispatch 方法简介
doDispatch 方法也非常简洁,从顶层设计了整个请求处理的过程。
doDispatch 中最核心的代码只要 4 句,它们的任务分别是:
- 根据 request 找到 Handler
- 根据 Handler 找到对应的 HandlerAdapter
- 用 HandlerAdapter 处理 Handler
- 调用 processDispatchResult 方法处理上面处理之后的结果(包括找到 View 并渲染输出给用户)
对应的代码如下:
mappedHandler = getHandler(processedRequest);
HandlerAdapter ha = getHandlerAdapter(mappedHandler.getHandler());
mv = ha.handle(processedRequest, response, mappedHandler.getHandler());
processDispatchResult(processedRequest, response, mappedHandler, mv, dispatchException);
这里需要解释三个概念,它们对学习 SpringMVC 非常重要。
Handler- 也就是处理器,它直接对应着 MVC 中的 C 也就是 Controller 层,它的具体表现形式有很多,可以是类,也可以是方法,如果你能想到别的表现形式也可以使用,它的类型是 Object。
- 之前写的标注了
@RequestMapping的所有方法都可以看作一个 Handler。只要可以实际处理请求就可以是 Handler
HandlerMapping- 用来查找 Handler 的,在 Spring MVC 中会处理很多请求,每个请求都需要一个 Handler 来处理,具体接收到一个请求后使用哪个 Handler 来处理呢?这就是 HandlerMapping 要做的事情。
HandlerAdapter- 很多人对这个的理解都不够准确,其实从名字上可以看出它是一个 Adapter,也就是适配器。因为 Spring MVC 中的 Handler 可以是任意的形式,只要能处理请求就 OK,但是 Servlet 需要的处理方法的结构确是固定的,都是以 request 和 response 为参数的方法(如 doService 方法)。怎么让固定的 Servlet 处理方法调用灵活的 Handler 来进行处理呢?这就是 HandlerAdapter 要做的事情。
继续
通俗来说,Handler 就用来干活的工具,HandlerMapping 用于根据需要干的活来找到相应的工具,HandlerAdapter 是使用工具干活的人。同时不同的 Handler 需要不同的 HandlerAdapter 去使用。
在 SpringMVC 的九大组件中 HandlerAdapter 是最复杂的。
此外,View 和 ViewResolver 的原理与 Handler 和 HandlerMapping 的原理类似。View 是用来展示数据的,而 ViewResolver 是用来查找 View 的。通俗地讲就是干完活后需要写报告,写报告有需要模板(比如,是调查报告还是验收报告或者是下一步工作的请示等等),View 就是所需要的模板,模板就像公文里面的格式,内容就是 Model 里面的数据,ViewResolver 就是用来选择使用哪个模板的。
现在回过头去看上面的四句代码就应该觉得很容易理解了,它们分别是:
- 使用 HandlerMapping 找到干活的 Handler
- 找到使用 Handler 的 HandlerAdapter
- 让 HandlerAdapter 使用 Handler 干活
- 干完活之后将结果写个报告交上去(通过 View 展示给客户)
(4)doDispatch 结构
前面介绍了 doDispatch 做的 4 件事,不过只是整体介绍,下面详细分析 doDispatch 内部的结构及处理流程。
首先看看 doDispatch 的代码:
// org.springframework.web.servlet.DispatcherServlet#doDispatch()

protected void doDispatch(HttpServletRequest request, HttpServletResponse response) throws Exception {
    HttpServletRequest processedRequest = request;
    HandlerExecutionChain mappedHandler = null;
    boolean multipartRequestParsed = false;

    WebAsyncManager asyncManager = WebAsyncUtils.getAsyncManager(request);

    try {
        ModelAndView mv = null;
        Exception dispatchException = null;

        try {
            // 检查是不是上传请求
            processedRequest = checkMultipart(request);
            multipartRequestParsed = (processedRequest != request);

            // Determine handler for the current request.
            // 根据 request 找到 Handler
            mappedHandler = getHandler(processedRequest);
            if (mappedHandler == null) {
                noHandlerFound(processedRequest, response);
                return;
            }

            // Determine handler adapter for the current request.
            // 根据 Handler 找到 HandlerAdapter
            HandlerAdapter ha = getHandlerAdapter(mappedHandler.getHandler());

            // Process last-modified header, if supported by the handler.
            // 处理 GET、HEAD 请求的 Last-Modified
            String method = request.getMethod();
            boolean isGet = HttpMethod.GET.matches(method);
            if (isGet || HttpMethod.HEAD.matches(method)) {
                long lastModified = ha.getLastModified(request, mappedHandler.getHandler());
                if (new ServletWebRequest(request, response).checkNotModified(lastModified) && isGet) {
                    return;
                }
            }

            // 执行相应 Interceptor 的 preHandle
            if (!mappedHandler.applyPreHandle(processedRequest, response)) {
                return;
            }

            // Actually invoke the handler.
            // HandlerAdapter 使用 Handler 来处理请求
            mv = ha.handle(processedRequest, response, mappedHandler.getHandler());

            // 如果需要异步处理,直接返回
            if (asyncManager.isConcurrentHandlingStarted()) {
                return;
            }

            // 当 view 为空时(比如,Handler 返回值为 void),根据 request 设置默认 view
            applyDefaultViewName(processedRequest, mv);
            // 执行相应 Interceptor 的 postHandle
            mappedHandler.applyPostHandle(processedRequest, response, mv);
        }
        catch (Exception ex) {
            dispatchException = ex;
        }
        catch (Throwable err) {
            // As of 4.3, we're processing Errors thrown from handler methods as well,
            // making them available for @ExceptionHandler methods and other scenarios.
            dispatchException = new NestedServletException("Handler dispatch failed", err);
        }

        // 处理返回结果。包括异常处理、渲染页面、发出完成通知触发 Interceptor 的 afterCompletion
        processDispatchResult(processedRequest, response, mappedHandler, mv, dispatchException);
    }
    catch (Exception ex) {
        triggerAfterCompletion(processedRequest, response, mappedHandler, ex);
    }
    catch (Throwable err) {
        triggerAfterCompletion(processedRequest, response, mappedHandler,
                               new NestedServletException("Handler processing failed", err));
    }
    finally {
        // 判断是否执行异步请求
        if (asyncManager.isConcurrentHandlingStarted()) {
            // Instead of postHandle and afterCompletion
            if (mappedHandler != null) {
                mappedHandler.applyAfterConcurrentHandlingStarted(processedRequest, response);
            }
        }
        else {
            // 删除上传请求的资源
            // Clean up any resources used by a multipart request.
            if (multipartRequestParsed) {
                cleanupMultipart(processedRequest);
            }
        }
    }
}
doDispatch 大体可以分为两部分:处理请求和渲染页面。
开头部分先定义了几个变量,在后面要用到,如下:
HttpServletRequest processedRequest = request:实际处理时所用的 request,如果不是上传请求则直接使用接收到的 request,否则封装为上传类型的 requestHandlerExecutionChain mappedHandler = null:处理请求的处理器链(包含处理器和对应的 Interceptor)boolean multipartRequestParsed = false:是不是上传请求的标志ModelAndView mv = null:封装 Model 和 View 的容器,此变量在整个 Spring MVC 处理的过程中承担非常重要的角色,如果使用过 Spring MVC 就不会对 ModelAndView 陌生Exception dispatchException = null:处理请求过程中抛出的异常。需要注意的是它并不包含渲染过程抛出的异常
doDispatch 中首先检查是不是上传请求,如果是上传请求,则将 request 转换为 MultipartHttpServletRequest,并将 multipartRequestParsed 标志设置为 true。其中使用到了 MultipartResolver。
然后通过 getHandler 方法获取 Handler 处理器链,其中使用到了 HandlerMapping,返回值为 HandlerExecutionChain 类型,其中包含着与当前 request 相匹配的 Interceptor 和 Handler。
getHandler 代码如下:
// org.springframework.web.servlet.DispatcherServlet#getHandler()

protected HandlerExecutionChain getHandler(HttpServletRequest request) throws Exception {
    if (this.handlerMappings != null) {
        for (HandlerMapping mapping : this.handlerMappings) {
            HandlerExecutionChain handler = mapping.getHandler(request);
            if (handler != null) {
                return handler;
            }
        }
    }
    return null;
}
方法结构非常简单,HandlerMapping 在后面在讲解,HandlerExecutionChain 的类型类似于前面 Tomcat 中讲过的 Pipeline,Interceptor 和 Handler 相当于里面的 Valve 和 BaseValve,执行时先依次执行 Interceptor 的 preHandle 方法,最后执行 Handler,返回的时候按相反的顺序执行 Interceptor 的 postHandle 方法。就好像要去一个地方,Interceptor 是要经过的收费站,Handler 是目的地,去的时候和返回的时候都要经过加油站,但两次所经过的顺序是相反的。
接下来是处理 GET、HEAD 请求的 Last-Modified。当浏览器第一次根服务器请求资源的(GET、Head 请求)时,服务器在返回的请求头里面会包含一个 Last-Modified 的属性,代表资源最后是什么时候修改的。在浏览器之后发送请求时都会同时发送之前接收到的 Last-Modified,服务器接收到带 Last-Modified 的请求后会用其值和自己实际资源的最后修改时间做对比,如果资源过期了则返回新的资源(同时返回新的 Last-Modified),否则直接返回 304 状态码表示资源未过期,浏览器直接使用之前缓存的结果。
接下来依次调用相应 Interceptor 的 preHandle。
处理完 Interceptor 的 preHandle 之后就到了此方法最关键的地方 —— 让 HandlerAdapter 使用 Handler 处理请求,Controller 就是在这个地方执行的。这里主要使用了 HandlerAdatper,具体内容之后分析。
Handler 处理完请求后,如果需要异步处理,则直接返回,如果不需要异步处理,当 view 为空时(如 Handler 返回值为 void),设置默认 view,然后执行相应 Interceptor 的 postHandle。设置默认 view 的过程中使用了 ViewNameTranslator。
到这里请求处理的内容就完成了,接下来使用 processDispatchResult 方法处理前面返回的结果,其中包括处理异常、渲染页面、触发 Interceptor 的 afterCompletion 方法三部分内容。
先说一下 doDispatch 的异常处理结构。doDispatch 有两层异常捕获,内层是捕获在对请求进行处理的过程中抛出的异常,外除主要是在处理渲染页面时抛出的。
内层的异常,也就是执行请求处理时的异常会设置到 dispatchException 变量,然后在 processDispatchResult 方法中进行处理,外层则时处理 processDispatchResult 方法抛出的异常。
processDispatchResult 代码如下:
// org.springframework.web.servlet.DispatcherServlet#processDispatchResult()

private void processDispatchResult(HttpServletRequest request, HttpServletResponse response,
                                   @Nullable HandlerExecutionChain mappedHandler, @Nullable ModelAndView mv,
                                   @Nullable Exception exception) throws Exception {

    boolean errorView = false;

    // 如果请求处理的过程中有异常抛出则处理异常
    if (exception != null) {
        if (exception instanceof ModelAndViewDefiningException) {
            logger.debug("ModelAndViewDefiningException encountered", exception);
            mv = ((ModelAndViewDefiningException) exception).getModelAndView();
        }
        else {
            Object handler = (mappedHandler != null ? mappedHandler.getHandler() : null);
            mv = processHandlerException(request, response, handler, exception);
            errorView = (mv != null);
        }
    }

    // 渲染页面
    // Did the handler return a view to render?
    if (mv != null && !mv.wasCleared()) {
        render(mv, request, response);
        if (errorView) {
            WebUtils.clearErrorRequestAttributes(request);
        }
    }
    else {
        if (logger.isTraceEnabled()) {
            logger.trace("No view rendering, null ModelAndView returned.");
        }
    }

    if (WebAsyncUtils.getAsyncManager(request).isConcurrentHandlingStarted()) {
        // Concurrent handling started during a forward
        // 如果启动了异步处理则返回
        return;
    }

    // 发出请求处理完成的通知,触发 Interceptor 的 afterCompletion
    if (mappedHandler != null) {
        // Exception (if any) is already handled..
        mappedHandler.triggerAfterCompletion(request, response, null);
    }
}
可以看到 processDipatchResult 处理异常的方式其实就是将相应的错误页面设置到了 View,在其中的 processHandlerException 方法中用到了 HandlerExceptionResolver。
渲染页面具体在 render 方法中执行,render 中首先对 response 设置了 Local,过程使用了 LocaleResolver,然后判断 View 如果是 String 类型则调用 resolveViewName 方法使用 ViewResolver 得到实际的 View,最后调用 View 的 render 方法对页面进行具体渲染,渲染的过程中使用到了 ThemeResolver。
最后通过 mappedHandler 的 triggerAfterCompletion 方法触发 Interceptor 的 afterCompletion 方法,这里的 Interceptor 也是按相反的顺序来执行的。到这里 processDispatchResult 方法就执行完了。
再返回 doDispatch 方法中,在最后的 finally 中判断是否请求启动了异步处理,如果启动了则调用相应异步处理的拦截器,否则如果是上传请求则删除上传过程中产生的临时资源。
doDispatch 方法就分析完了。可以看到 Spring MVC 的处理方式是现在顶层设计好整体结构,然后将具体的处理交给不同的组件具体去实现的。doDispatch 的流程图如下所示:
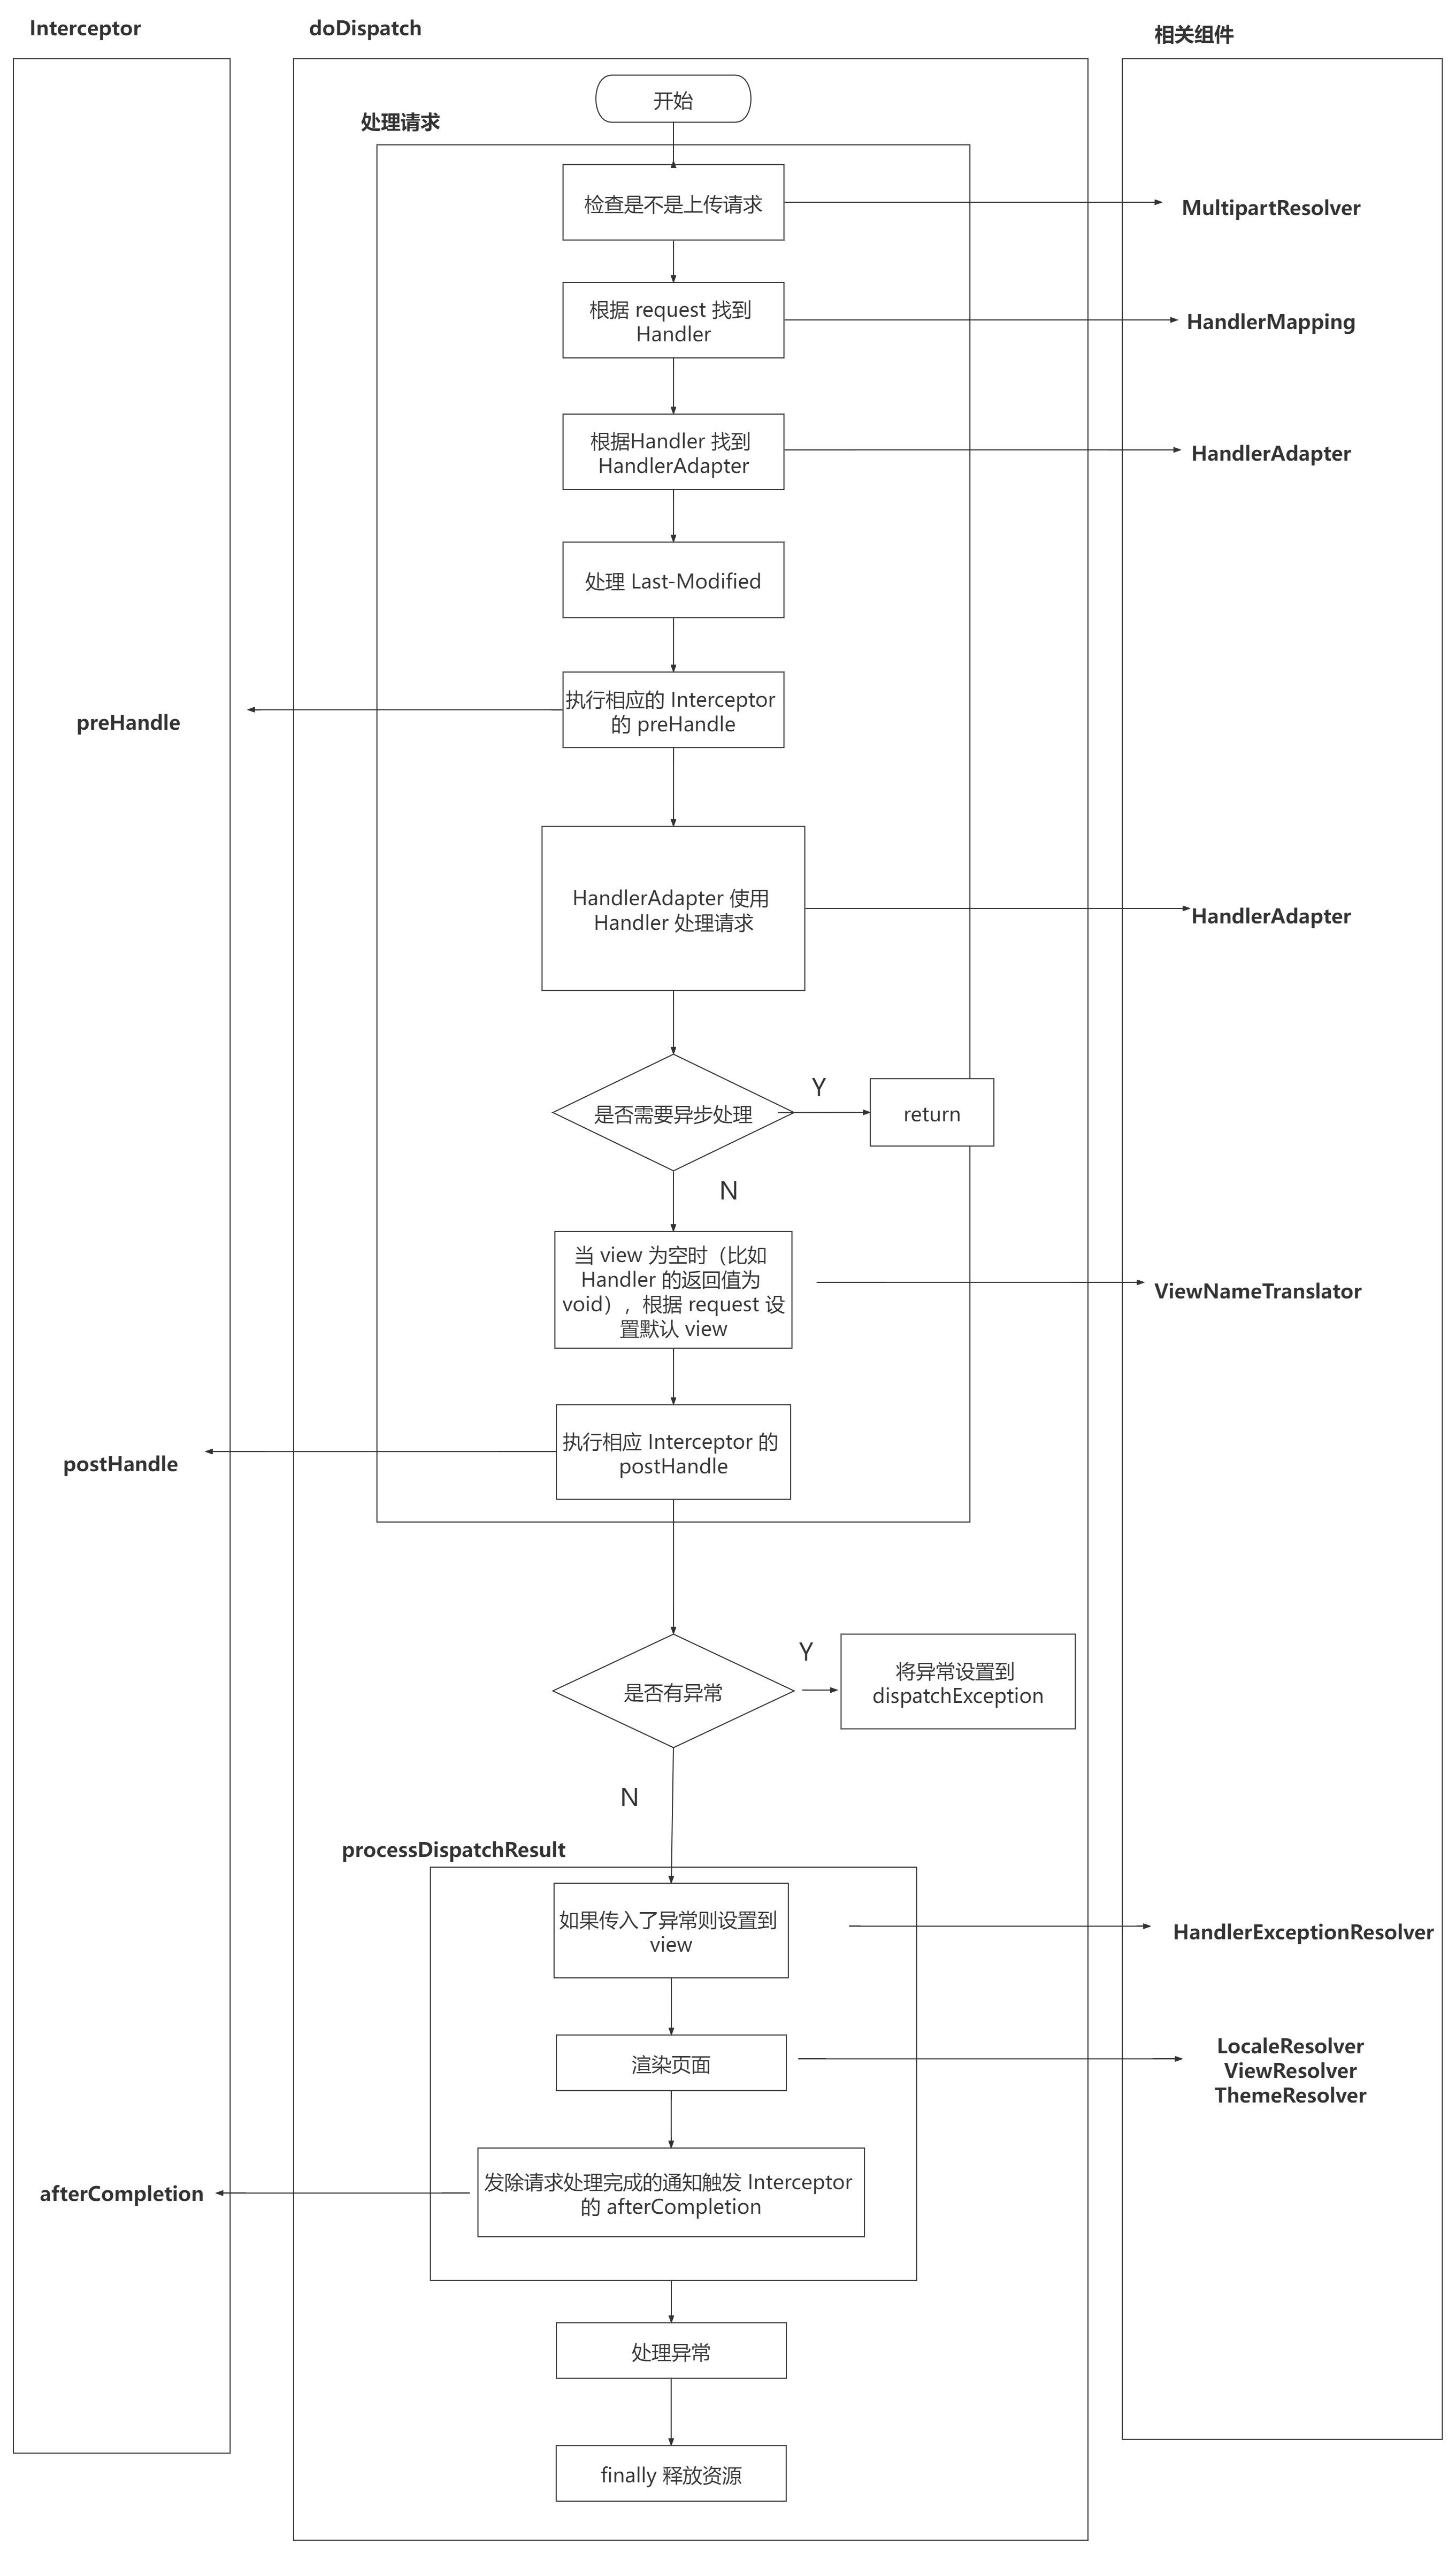
上图中间是 doDispatch 的处理流程图,左边是 Interceptor 相关处理方法的调用位置,右边是 doDispatch 处理过程中涉及到的组件。
中间上半部分的处理请求对应着 MVC 中的 Controller 层(也就是 C),下半部分的 processDispatchResult 主要对应 MVC 中的 View 也就是 V 层,M 层也就是 Model 贯穿于整个过程中。
理解了 doDispatch 的结构,在开发过程中如果遇到问题,就可以知道在哪一部分出现了问题,从而缩小范围,有的放矢地去解决问题。
4、小结
前面整体分析了 Spring MVC 中请求处理的过程。首先对三个 Servlet 进行了分析,然后单独分析了 DispatcherServlet 中的 doDispatch 方法。
三个 Servlet 处理的流程大致如下:
- HttpServletBean:没有参于具体的处理过程
- FrameworkServlet:将不同类型的请求合并到了 processRequest 方法统一处理,processRequest 方法做了如下三件事:
- 调用了 doService 模板方法具体处理请求
- 将当前请求的 LocaleContext 和 ServletRequestAttributes 在处理请求前设置到了 LocaleContextHolder 和 RequestContextHolder,并在请求处理完成后恢复
- 请求处理完成后发布了 ServletRequestHandledEvent 消息
- DispatcherServlet:doService 方法完成 Spring MVC 中请求处理过程的顶层设计,它使用 DispatcherServlet 中的九大组件完成具体的请求处理。另外 HandlerMapping、Handler 和 HandlerAdapter 这三个概念的含义以及它们之间的关系也非常重要。