一、SpringBoot 特点
1、依赖管理
采用 Maven 架构工具的 Springboot 工程的 pom 文件中,有这样的标签:
<!-- 依赖管理 -->
<parent>
    <groupId>org.springframework.boot</groupId>
    <artifactId>spring-boot-starter-parent</artifactId>
    <version>2.6.0</version>
    <relativePath/> <!-- lookup parent from repository -->
</parent>

<!-- 点进 parent 工程后里面还有一层父项目 -->
<parent>
    <groupId>org.springframework.boot</groupId>
    <artifactId>spring-boot-dependencies</artifactId>
    <version>2.6.0</version>
</parent>

<!-- spring-boot-dependencies 包中声明几乎开发中常用的所有 jar 的版本号,自动版本仲裁机制 -->- 开发导入 starter 场景启动器
<!--
	1. springboot 官方 starter 命名规则:spring-boot-starter-*
	2. 在某个开发场景中只需引入对应的 starter,那么所需依赖都会引进来
	3. 某些情况需要自定义 starter,官方推荐自定义的 starter 命名规则:*-spring-boot-starter
	4. 所有场景启动器最底层的依赖
-->
<dependency>
    <groupId>org.springframework.boot</groupId>
    <artifactId>spring-boot-starter</artifactId>
    <version>2.6.0</version>
    <scope>compile</scope>
</dependency>- 无需关注版本号,自动版本仲裁
<!--
	1. 引入默认依赖都可以不写版本号
	2. 引入非版本仲裁的 jar,要写版本号
-->- 可以修改版本号
原理见:https://naivekyo.github.io/2021/11/12/maven-common-operation
<!-- 1. 查看 spring-boot-dependencies 包中规定了当前依赖的版本(在 dependencyManagement 和  properties 标签中) -->

<!-- 2. 在当前项目里面重写配置 (具体原理是 Maven 的依赖调解原则) -->
<properties>
	<mysql.version>5.1.49</mysql.version>
</properties>
2、自动配置
以 spring-boot-starter-web 场景为例:
- 自动装配好 Tomcat
- 自动引入 Tomcat 依赖
- 配置 Tomcat
<dependency>
    <groupId>org.springframework.boot</groupId>
    <artifactId>spring-boot-starter-tomcat</artifactId>
    <version>2.6.0</version>
    <scope>compile</scope>
</dependency>- 自动配置好 SpringMVC
- 引入 SpringMVC 全套组件
- 自动配置好 SpringMVC 常用组件(功能)
<dependency>
    <groupId>org.springframework</groupId>
    <artifactId>spring-webmvc</artifactId>
    <version>5.3.13</version>
    <scope>compile</scope>
</dependency>- 自动配置好 Web 常用功能,如:字符编码问题
- SpringBoot 已经帮我们配置好了所有 web 开发的常见容器
- 默认的包结构
- https://docs.spring.io/spring-boot/docs/current/reference/html/using.html#using.structuring-your-code.using-the-default-package
- 主程序所在包及其下面所有子包中的组件都会被扫描注册到 IOC 容器中
- 无需以前的包扫描机制
- 想要改变默认的包扫描规则,可以使用
@SpringBootApplication(scanBasePackages = "com.example")指定包路径
- 各种配置拥有默认值
- 默认配置最终都是映射到某一个类上,这个类的对象存在于 IOC 容器中
- 按需加载所有自动配置项
- 引入了哪些场景,这些场景的自动配置才会生效
- SpringBoot 的所有自动配置功能都在
<dependency>
    <groupId>org.springframework.boot</groupId>
    <artifactId>spring-boot-autoconfigure</artifactId>
    <version>2.6.0</version>
    <scope>compile</scope>
</dependency>- ……
二、容器功能
1、组件添加
(1) @Configuration
- 基本使用
- Full 模式和 Lite 模式
- 实例
- 最佳实战
- 配置类中注册的组件之间无依赖关系用 Lite 模式加速容器启动过程,减少判断
- 配置类中注册的组件之间有依赖关系,方法会被调用得到 IOC 容器中的单实例组件,用 Full 模式
基本使用
测试类:
@Data
@AllArgsConstructor
@NoArgsConstructor
public class User implements Serializable {

    private static final long serialVersionUID = -2918082554678902109L;

    private Integer id;

    private String name;

}

@Data
@AllArgsConstructor
@NoArgsConstructor
public class Pet implements Serializable {

    private static final long serialVersionUID = 3176227278246712244L;

    private String name;

}

/**
 * 1、配置类里面使用 @Bean 注解在方法上给容器注册组件,默认也是单实例的
 * 2、配置类本身就是组件
 * 3、从 spring5.2 后, @Configuration 注解中多了一个属性 proxyBeanMethods 默认值 true
 *    Full 模式: proxyBeanMethods = true
 *    Lite 模式: proxyBeanMethods = false
 *      解决组件依赖问题.
 */
@Configuration(proxyBeanMethods = true)
public class MyConfig {

    /**
     * 给容器中添加一个组件:
     * 方法名就是 Bean 的 id;
     * 返回类型就是 Bean 的类型;
     * 返回的值就是组件在容器中的实例;
     * 默认还是 singleton 模式的
     */
    @Bean
    public User user() {
        return new User(22, "NaiveKyo");
    }

    @Bean
    public Pet pet() {
        return new Pet("Milo");
    }
}
上面的代码中介绍了测试使用的 User 和 Pet 类,我们通过配置类将其注册到 IOC 容器中,用于替代以前的 xml。
测试代码:
// 测试 3: 获取 IOC 容器并获取指定配置类, 然后调用其中被 @Bean 注解标注的方法
@RequestMapping(value = "/test2", method = RequestMethod.GET)
@ResponseBody
public String test2(HttpServletRequest request) {

    WebApplicationContext rootContext = WebApplicationContextUtils.getRequiredWebApplicationContext(request.getServletContext());

    // 获取到的是被 CGLIB 代理的配置类(原因: proxyBeanMethods = true)
    MyConfig myConfig = rootContext.getBean(MyConfig.class);
    // com.example.springboot1one.config.MyConfig$$EnhancerBySpringCGLIB$$1225388a@1a3ebb1c
    System.out.println(myConfig);

    // 下面获取的都是 IOC 容器中的实例
    User userBean = rootContext.getBean(User.class);
    System.out.println(userBean); // User(id=22, name=NaiveKyo)

 	/**
    * 如果在配置类中声明 @Configuration(proxyBeanMethods = true),
    * 那么 SpringBoot 总会检查这个组件是否已经注册到容器中, 如果已注册, 就生成该配置类的代理对象,
    * 通过代理对象调用被代理类的@Bean修饰的方法, 然后会去容器中寻找目标实例。
    *
    * 目的: 保持组件单实例
    *
    * 反之, 如果 proxyBeanMethods = false, 那么通过全局上下文获取到的配置类实例就不会被代理,
    * 而是直接拿到容器中的配置类对象本身;
    * 此时调用@Bean修饰的方法获取到的对象就是 new 出来的和容器中不同的对象。
    */
    User user1 = myConfig.user();
    User user2 = myConfig.user();

    System.out.println(user1 == user2);   // true

    return "ok2";
}不难看出其中重点就在于:@Configuration 注解的 proxyBeanMethods 属性,看下面的讲解。
组件依赖问题
假如现在测试条件变成这样:
@Data
@AllArgsConstructor
@NoArgsConstructor
public class User implements Serializable {

    private static final long serialVersionUID = -2918082554678902109L;

    private Integer id;

    private String name;

    private Pet pet;

}
可以看到 User 类中持有一个 Pet 类型的对象。
@Configuration(proxyBeanMethods = true)
public class MyConfig {

    @Bean
    public User user() {
        return new User(22, "NaiveKyo", pet());
    }

    @Bean
    public Pet pet() {
        return new Pet("Milo");
    }
}现在的情况:proxyBeanMethods = true
// 测试 4: 组件依赖问题
@RequestMapping(value = "/test3", method = RequestMethod.GET)
@ResponseBody
public String test3(HttpServletRequest request) {

    WebApplicationContext rootContext = WebApplicationContextUtils.getRequiredWebApplicationContext(request.getServletContext());

    User user = rootContext.getBean(User.class);
    Pet pet = rootContext.getBean(Pet.class);

    Pet pet1 = user.getPet();

    System.out.println(pet == pet1);    // true

    return "ok3";
}
可以看到此时 User 对象中持有的 Pet 类型的对象其实就是容器中的 Pet 实例。
那么如果把 proxyBeanMethods 改为 false 会发生什么呢?
System.out.println(pet == pet1); // false此时容器中 User 对象持有的 Pet 类型的对象就不是容器中注册的 Pet 实例了。
Full 模式和 Lite 模式
两种模式的选取取决于在配置类中注册的组件之间是否有依赖关系,看下面:
// MyConfig.class

@Bean
public Pet pet() {
    return new Pet("Milo");
}

// 无依赖关系
@Bean
public User user() {
    // User 类中没有 Pet 类型成员
    return new User(22, "NaiveKyo");
}

// 有依赖关系
@Bean
public User user() {
    // User 类中有 Pet 类型成员
    return new User(22, "NaiveKyo", pet());
}- 配置类中注册的组件之间无依赖关系时可以给配置类设置
@Configuration(proxyBeanMethods = false)即 Lite 模式,这样容器在启动过程中加载配置类调用其 @Bean 修饰的方法注册组件时就不会判断容器中是否已经存在该组件 - 配置类中注册的组件之间有依赖关系时,使用
@Configuration默认的proxyBeanMethods = true,即 Full 模式,这样通过配置类的 @Bean 修饰的方法注册组件时就会进行判断,保证容器中实例都是 singleton 模式。
(2) @Bean、@Component、@Controller、@Service、@Repository
除了可以在配置类中向 IOC 容器中注册组件之外,(在 SpringBoot 工程能够扫描到的包下)使用如下注解也可以向容器中注册组件:
@Component、@Controller、@Service、@Repository
(3) @ComponentScan、@Import
@Import 注解:
@Target(ElementType.TYPE)
@Retention(RetentionPolicy.RUNTIME)
@Documented
public @interface Import {

	/**
	 * {@link Configuration @Configuration}, {@link ImportSelector},
	 * {@link ImportBeanDefinitionRegistrar}, or regular component classes to import.
	 */
	Class<?>[] value();

}
该注解可以标注在任意类上,但是在 Spring 工程中一般标注在组件上(@Component 修饰的类,很多注解的底层都引入了 @Component,例如 @Controller、@Service、@Repository 等等)。
这是因为 SpringBoot 启动时会扫描该注解修饰的类,然后通过其 value 属性中的 Class 对象调用无参构造器生成实例。
看例子:
public class TestImport {

}

@Import({TestImport.class, User.class})
@Configuration(proxyBeanMethods = true)
public class MyConfig {

    @Bean
    public User user() {
        return new User(22, "NaiveKyo", pet());
    }

    @Bean
    public Pet pet() {
        return new Pet("Milo");
    }
}
此时我们通过两种方式向容器中注入了 User 类型的不同实例。
测试代码:
// 测试 5: @Import 注解
@RequestMapping(value = "/test4", method = RequestMethod.GET)
@ResponseBody
public String test4(HttpServletRequest request) {

    WebApplicationContext rootContext = WebApplicationContextUtils.getRequiredWebApplicationContext(request.getServletContext());

    String[] beanNamesForType = rootContext.getBeanNamesForType(User.class);

    // 找到 IOC 容器中注入的两个类型为 User 的实例的名称
    for (String s : beanNamesForType) {
        System.out.println(s);
        // com.example.springboot1one.bean.User
        // user
    }

    // 找到 TestImport 类型的实例
    String[] testImportNames = rootContext.getBeanNamesForType(TestImport.class);
    for (String testImportName : testImportNames) {
        System.out.println(testImportName);
        // com.example.springboot1one.bean.TestImport
    }

    // 找到 HelloController
    String[] helloBeanNames = rootContext.getBeanNamesForType(HelloController.class);
    for (String helloBeanName : helloBeanNames) {
        System.out.println(helloBeanName);
        // helloController
    }

    return "ok4";
}
可以看到在中使用 @Import 注解注入的组件实例的名称是全类名,而通过 @Bean 和其他例如 @Controller 等注解注入的组件实例的名称是方法名或者类名称首字母缩写。
(4) @Conditional
条件装配:满足 @Conditional 指定的条件,则进行组件注入。
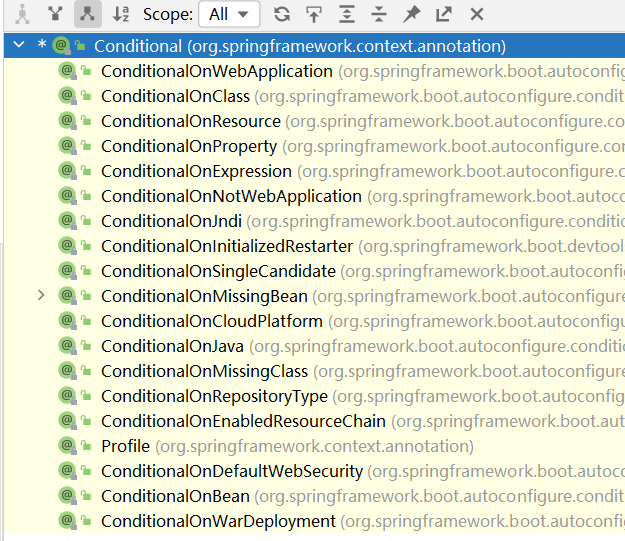
在 idea 中搜索到这个注解,使用快捷键 ctrl + H 打开它的 type hierarchy,可以看到该注解有很多衍生注解。

假如说我们要找一个容器中不存在的组件,可以这样找:
// 测试 6: @Conditional 注解
@RequestMapping(value = "/test5", method = RequestMethod.GET)
@ResponseBody
public String test5(HttpServletRequest request) {

    WebApplicationContext rootContext = WebApplicationContextUtils.getRequiredWebApplicationContext(request.getServletContext());

    boolean testConditional = rootContext.containsBean("testConditional");
    System.out.println("容器中是否存在名为 testConditional 的组件? " + (testConditional ? "是" : "否"));
    // 容器中是否存在名为 testConditional 的组件? 否

    boolean testUser = rootContext.containsBean("user");
    System.out.println("容器中是否存在名为 user 的组件? " + (testUser ? "是" : "否"));
    // 容器中是否存在名为 user 的组件? 是

    return "ok5";
}
可知名为 testConditional 的组件没有在容器中注册,那么可以这样在配置类中设置:
@Configuration
public class MyConfig {

    @ConditionalOnBean(value = {TestConditional.class})
    @Bean
    public User user() {
        return new User(22, "NaiveKyo");
    }

}
此时再运行前面的测试代码就会出现:
// 容器中是否存在名为 testConditional 的组件? 否
// 容器中是否存在名为 user 的组件? 否
可知 @ConditionalOnBean 注解的作用就是容器中存在指定的组件实例时,被该注解修饰的部分才会生效。
源码:
@Target({ ElementType.TYPE, ElementType.METHOD })
@Retention(RetentionPolicy.RUNTIME)
@Documented
@Conditional(OnBeanCondition.class)
public @interface ConditionalOnBean {
    …………
}
可知该注解可以修饰类和方法。
2、原生配置文件引入
@ImportResource 注解用于将 spring 的 xml 文件中注册的 bean 转换为配置类注入。
application-beans.xml
<?xml version="1.0" encoding="UTF-8"?>
<beans xmlns="http://www.springframework.org/schema/beans"
       xmlns:xsi="http://www.w3.org/2001/XMLSchema-instance"
       xmlns:p="http://www.springframework.org/schema/p"
       xsi:schemaLocation="http://www.springframework.org/schema/beans
       http://www.springframework.org/schema/beans/spring-beans.xsd">

    <bean id="testImportResource" class="com.example.springboot1one.bean.TestImportResource" />

</beans>
MyConfig.java
@Import({TestImport.class, User.class})
@ImportResource("classpath:application-beans.xml")
@Configuration
public class MyConfig {

    @ConditionalOnBean(value = {TestConditional.class})
    @Bean
    public User user() {
        return new User(22, "NaiveKyo", pet());
    }

    @Bean
    public Pet pet() {
        return new Pet("Milo");
    }
}
测试:
// 测试 7: @ImportResource 注解
@RequestMapping(value = "/test6", method = RequestMethod.GET)
@ResponseBody
public String test6(HttpServletRequest request) {

    WebApplicationContext rootContext = WebApplicationContextUtils.getRequiredWebApplicationContext(request.getServletContext());

    boolean testImportResource = rootContext.containsBean("testImportResource");
    System.out.println("容器中是否存在名为 testImportResource 的组件? " + (testImportResource ? "是" : "否"));
    // 容器中是否存在名为 testImportResource 的组件? 是

    return "ok6";
}
3、配置绑定
举个简单的例子,在 Java 中从 properties 配置文件中读取配置封装到 JavaBean 中:
@Test
public void testProperties() throws IOException {

    Properties properties = new Properties();

    properties.load(new FileInputStream("a.properties"));

    Enumeration<?> enumeration = properties.propertyNames();
    while (enumeration.hasMoreElements()) {
        String key = (String) enumeration.nextElement();
        String value = properties.getProperty(key);

        System.out.println("key: " + key + " value: " + value);
        // 封装到 JavaBean ......
    }
}
现在在 SpringBoot 中使用注解可以很方便做到配置绑定。
(1) @ConfigurationProperties
@ConfigurationProperties 注解的作用是给 Spring IOC 容器中注册的组件绑定一个外部配置文件,用于将相关属性注入到该组件中。
查看其源码可以发现,该注解可以用到类或方法上,Spring 工程中一般建议用在 @Configuration 标注的类或者 @Bean 标注的方法上。
绑定的原理是调用属性的 setter 方法或者使用了 @ConstructorBinding 注解的构造方法。
创建一个测试类:
@Data
@AllArgsConstructor
@NoArgsConstructor
@Component
@ConfigurationProperties(prefix = "mycar")
public class Car implements Serializable {

    private static final long serialVersionUID = -1096069076931448275L;

    private String brand;

    private Integer price;

}
配置文件
mycar.brand = BYD
mycar.price = 100000
此时 IOC 容器中名为 car 的组件就和配置文件绑定到一块儿去了,而且会去找配置文件中以 mycar 开头的属性。
测试:
// 测试 8: @ConfigurationProperties 注解
@RequestMapping(value = "/test7", method = RequestMethod.GET)
@ResponseBody
public String test7(HttpServletRequest request) {

    WebApplicationContext rootContext = WebApplicationContextUtils.getRequiredWebApplicationContext(request.getServletContext());

    Car car = rootContext.getBean(Car.class);

    // Car(brand=BYD, price=100000)
    System.out.println(car);

    return "ok7";
}
(2) @EnableConfigurationProperties
@EnableConfigurationProperties 需要结合 @ConfigurationProperties 一起使用。
查看源码可知前者是标注在类上的,在 Spring 工程中一般都是标注在配置类上,它有两个作用:
- 将指定类注册到 IOC 容器中
- 注册的 Bean 名称为类名的全路径(和 @Import 注册的组件名称格式一样)
- 为该组件开启配置绑定功能
测试类:(注意需要结合 @ConfigurationProperties 使用)
@Data
@AllArgsConstructor
@NoArgsConstructor
@ConfigurationProperties(prefix = "mycar")
public class Car implements Serializable {

    private static final long serialVersionUID = -1096069076931448275L;

    private String brand;

    private Integer price;

}
配置类:
@Import({TestImport.class, User.class})
@ImportResource("classpath:application-beans.xml")
@Configuration
@EnableConfigurationProperties({Car.class})
public class MyConfig {

    @ConditionalOnBean(value = {TestConditional.class})
    @Bean
    public User user() {
        return new User(22, "NaiveKyo", pet());
    }

    @Bean
    public Pet pet() {
        return new Pet("Milo");
    }
}
测试代码:
// 测试 9: @EnableConfigurationProperties 结合 @ConfigurationProperties
@RequestMapping(value = "/test9", method = RequestMethod.GET)
@ResponseBody
public String test9() {

    // Car(brand=BYD, price=100000)
    return this.applicationContext.getBean(Car.class).toString();
}
三、自动装配原理入门
1、引导加载自动装配类
在 SpringBoot 项目的主启动类上有一个注解 @SpringBootApplication。
查看其源码:
@SpringBootConfiguration
@EnableAutoConfiguration
@ComponentScan(excludeFilters = { @Filter(type = FilterType.CUSTOM, classes = TypeExcludeFilter.class),
		@Filter(type = FilterType.CUSTOM, classes = AutoConfigurationExcludeFilter.class) })
下面依次介绍该组合注解的重要部分。
(1)@SpringBootConfiguration
查看源码:
@Target(ElementType.TYPE)
@Retention(RetentionPolicy.RUNTIME)
@Documented
@Configuration
@Indexed
public @interface SpringBootConfiguration {

	@AliasFor(annotation = Configuration.class)
	boolean proxyBeanMethods() default true;

}
可知该注解其实就是一个 @Configuration 注解,那么标注了 @SpringBootConfiguration 注解的类就代表着整个 SpringBoot 项目的核心配置类。
(2)@EnableAutoConfiguration
查看源码:
@Target(ElementType.TYPE)
@Retention(RetentionPolicy.RUNTIME)
@Documented
@Inherited
@AutoConfigurationPackage
@Import(AutoConfigurationImportSelector.class)
public @interface EnableAutoConfiguration {

	String ENABLED_OVERRIDE_PROPERTY = "spring.boot.enableautoconfiguration";

	Class<?>[] exclude() default {};

	String[] excludeName() default {};

}
@AutoConfigurationPackage
源码:
@Import(AutoConfigurationPackages.Registrar.class)
public @interface AutoConfigurationPackage {}
可以看到该注解主要功能就是向容器中注入一个组件:AutoConfigurationPackages.Registrar,这是一个静态内部类:
static class Registrar implements ImportBeanDefinitionRegistrar, DeterminableImports {

    @Override
    public void registerBeanDefinitions(AnnotationMetadata metadata, BeanDefinitionRegistry registry) {
        register(registry, new PackageImports(metadata).getPackageNames().toArray(new String[0]));
    }

    @Override
    public Set<Object> determineImports(AnnotationMetadata metadata) {
        return Collections.singleton(new PackageImports(metadata));
    }

}
而这个静态类的功能是 向容器中注册一系列组件。(注册一系列组件其实就是主启动类所在的包下的所有组件,以及需要使用的 jar 包中的组件。)
方法:registerBeanDefinitions
- AnnotationMetadata :注解的元信息,该类的作用是得到标注在类上的注解信息,在这里得到的就是主启动类上的注解信息。
PackageImports(metadata).getPackageNames().toArray(new String[0])):这段代码的作用是得到主启动类所在的包的名称。register(BeanDefinitionRegistry registry, String... packageNames):该方法的作用就是使用 BeanDefinitionRegistry 为默认的包配置生成 BeanDefinition,从而进一步将默认包下所有能够注册到容器的组件注册进去。
@Import(AutoConfigurationImportSelector.class)
@EnableAutoConficuration 注解的第二个作用就是向容器中注册名为 AutoConfigurationImportSelector 的组件。
其中 selectImports 方法是关键。
// org.springframework.boot.autoconfigure.AutoConfigurationImportSelector#selectImports()

@Override
public String[] selectImports(AnnotationMetadata annotationMetadata) {
    if (!isEnabled(annotationMetadata)) {
        return NO_IMPORTS;
    }
    AutoConfigurationEntry autoConfigurationEntry = getAutoConfigurationEntry(annotationMetadata);
    return StringUtils.toStringArray(autoConfigurationEntry.getConfigurations());
}
利用 getAutoConfigurationEntry(annotationMetadata) 方法给容器批量导入一些组件。
// org.springframework.boot.autoconfigure.AutoConfigurationImportSelector#getAutoConfigurationEntry()

protected AutoConfigurationEntry getAutoConfigurationEntry(AnnotationMetadata annotationMetadata) {

    // 这里的 annotationMetadata 依旧是主启动类上的注解信息
    if (!isEnabled(annotationMetadata)) {
        return EMPTY_ENTRY;
    }

    AnnotationAttributes attributes = getAttributes(annotationMetadata);
    List<String> configurations = getCandidateConfigurations(annotationMetadata, attributes);
    configurations = removeDuplicates(configurations);
    Set<String> exclusions = getExclusions(annotationMetadata, attributes);
    checkExcludedClasses(configurations, exclusions);
    configurations.removeAll(exclusions);
    configurations = getConfigurationClassFilter().filter(configurations);
    fireAutoConfigurationImportEvents(configurations, exclusions);
    return new AutoConfigurationEntry(configurations, exclusions);
}
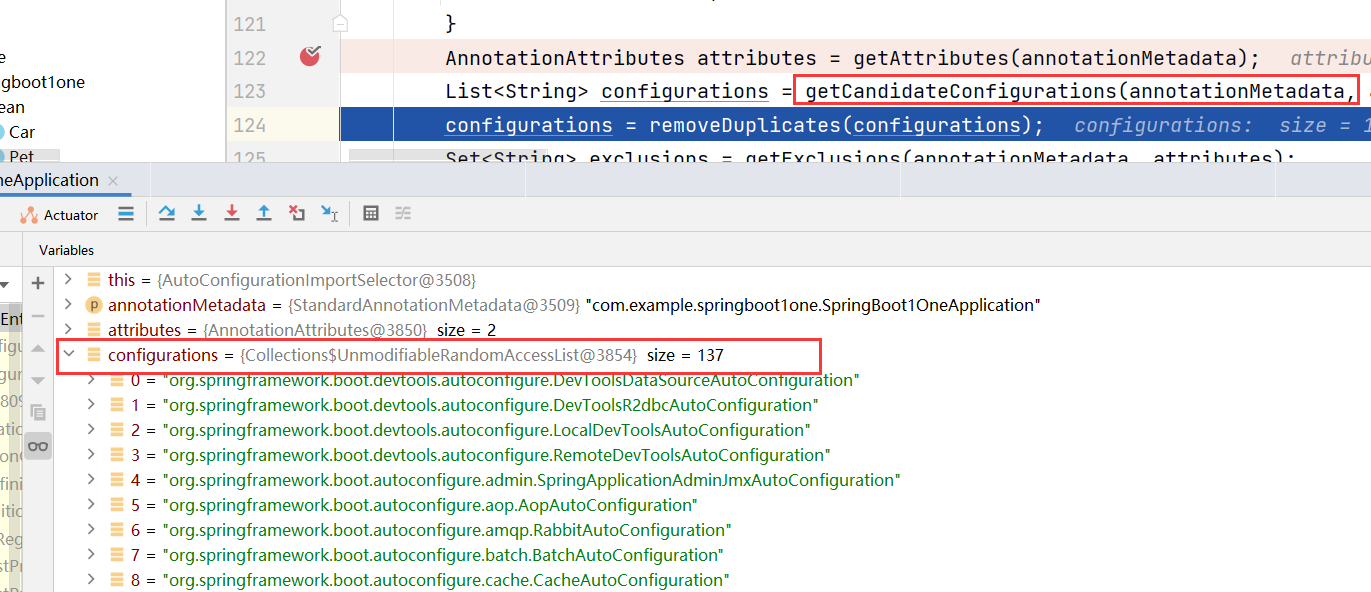
通过 getCandidateConfigurations 获取到所有场景下需要使用的自动装配类:

可以看到目前使用的 SpringBoot 版本下一共有 137 个开发场景(即 137 个自动装配类)。
// org.springframework.boot.autoconfigure.AutoConfigurationImportSelector#getCandidateConfigurations()

protected List<String> getCandidateConfigurations(AnnotationMetadata metadata, AnnotationAttributes attributes) {
    // 使用 Spring 的工厂加载器获取配置
    List<String> configurations = SpringFactoriesLoader.loadFactoryNames(getSpringFactoriesLoaderFactoryClass(),
                                                                         getBeanClassLoader());
    Assert.notEmpty(configurations, "No auto configuration classes found in META-INF/spring.factories. If you "
                    + "are using a custom packaging, make sure that file is correct.");
    return configurations;
}
// org.springframework.core.io.support.SpringFactoriesLoader#loadFactoryNames()
public static List<String> loadFactoryNames(Class<?> factoryType, @Nullable ClassLoader classLoader) {
ClassLoader classLoaderToUse = classLoader;
if (classLoaderToUse == null) {
classLoaderToUse = SpringFactoriesLoader.class.getClassLoader();
}
String factoryTypeName = factoryType.getName();
// 通过下面的方法获取信息
return loadSpringFactories(classLoaderToUse).getOrDefault(factoryTypeName, Collections.emptyList());
}
// 实际处理是在这个方法中
private static Map<String, List<String>> loadSpringFactories(ClassLoader classLoader) {
// 下面这个 result 就是需要加载的所有组件的相关信息
Map<String, List<String>> result = cache.get(classLoader);
if (result != null) {
return result;
}
result = new HashMap<>();
try {
// 可以看到有个属性 FACTORIES_RESOURCE_LOCATION = "META-INF/spring.factories"
Enumeration<URL> urls = classLoader.getResources(FACTORIES_RESOURCE_LOCATION);
while (urls.hasMoreElements()) {
URL url = urls.nextElement();
UrlResource resource = new UrlResource(url);
Properties properties = PropertiesLoaderUtils.loadProperties(resource);
for (Map.Entry<?, ?> entry : properties.entrySet()) {
String factoryTypeName = ((String) entry.getKey()).trim();
String[] factoryImplementationNames =
StringUtils.commaDelimitedListToStringArray((String) entry.getValue());
for (String factoryImplementationName : factoryImplementationNames) {
result.computeIfAbsent(factoryTypeName, key -> new ArrayList<>())
.add(factoryImplementationName.trim());
}
}
}
// Replace all lists with unmodifiable lists containing unique elements
result.replaceAll((factoryType, implementations) -> implementations.stream().distinct()
.collect(Collectors.collectingAndThen(Collectors.toList(), Collections::unmodifiableList)));
cache.put(classLoader, result);
}
catch (IOException ex) {
throw new IllegalArgumentException("Unable to load factories from location [" +
FACTORIES_RESOURCE_LOCATION + "]", ex);
}
return result;
}这里可以发现我们能够从 FACTORIES_RESOURCE_LOCATION = “META-INF/spring.factories” 这个属性代表的文件中获取到所有的自动装配类信息。
在 springboot 的自动装配包下可以找到这个文件。

该文件中在标有 # Auto Configure 注释下方写有所有的 xxxAutoConfiguration 类所在的路径。
可知 SpringBoot 项目一旦启动首先一定会收集并加载所有的自动装配类。
2、按需开启自动配置项
虽然一上来就将所有的自动装配类都加载类,但是在 getAutoConfigurationEntry 方法后续还会进行一些筛选:
// org.springframework.boot.autoconfigure.AutoConfigurationImportSelector#getAutoConfigurationEntry()

protected AutoConfigurationEntry getAutoConfigurationEntry(AnnotationMetadata annotationMetadata) {
    if (!isEnabled(annotationMetadata)) {
        return EMPTY_ENTRY;
    }

    // 获取主启动类上注解的相关信息
    AnnotationAttributes attributes = getAttributes(annotationMetadata);

    // 获取所有自动装配类的信息(当期 SpringBoot 版本一共 137 个)
    List<String> configurations = getCandidateConfigurations(annotationMetadata, attributes);

    // 去除 configurations 中重复的字符串
    configurations = removeDuplicates(configurations);

    // 根据主启动类上注解的信息获取不需要的自动装配信息
    Set<String> exclusions = getExclusions(annotationMetadata, attributes);
    checkExcludedClasses(configurations, exclusions);

    // 去除不需要的自动装配类
    configurations.removeAll(exclusions);

    // 通过配置类过滤器过滤掉当期 SpringBoot 项目不需要的场景(具体是通过 @Conditional 及其衍生注解处理的)
    configurations = getConfigurationClassFilter().filter(configurations);

    // 去除主启动类上标注的不需要的场景
    fireAutoConfigurationImportEvents(configurations, exclusions);

    return new AutoConfigurationEntry(configurations, exclusions);
}
通过上面的处理后,我们就可以得到当前 SpringBoot 项目所需要使用的开发场景了(就是用到了哪些 starter),然后就会根据相应的 xxxAutoConfiguration 类根据其中的 @Conditional 及其衍生注解向容器中注册所需要使用的组件(包括 @Import、@Bean 等注解注册的组件)。
总结
这样当 SpringBoot 工程启动后,IOC 容器中应该包括当前项目需要使用到的自动装配类,通过自动装配类注册的组件、其他诸如@Controller等注解注入的组件、各种配置属性类 等等。
3、修改默认配置
我们以 springmvc 的自动装配类为例:org.springframework.boot.autoconfigure.web.servlet.WebMvcAutoConfiguration。
// 表明这是一个配置类,而且使用的是 Lite 模式
@Configuration(proxyBeanMethods = false)
// 表面当前 web 开发环境为基于 Servlet 的原生 web 应用,而不是 webflux 响应式开发应用
@ConditionalOnWebApplication(type = Type.SERVLET)
// 要求 IOC 容器中必须存在 Servlet 开发需要的核心类
@ConditionalOnClass({ Servlet.class, DispatcherServlet.class, WebMvcConfigurer.class })
// WebMvcConfigurationSupport 必须没有被注册
@ConditionalOnMissingBean(WebMvcConfigurationSupport 必须没有被注册.class)
// springmvc 的自动装配的优先级
@AutoConfigureOrder(Ordered.HIGHEST_PRECEDENCE + 10)
// 要求在当前装配类装配之前必须已经存在的装配类
@AutoConfigureAfter({ DispatcherServletAutoConfiguration.class, TaskExecutionAutoConfiguration.class,
		ValidationAutoConfiguration.class })
public class WebMvcAutoConfiguration {}
从中找到装配 DispatcherServlet 的配置类 DispatcherServletAutoConfiguration:
可以看到其中对 DispatcherServlet 的处理。
@Bean(name = DEFAULT_DISPATCHER_SERVLET_BEAN_NAME)
public DispatcherServlet dispatcherServlet(WebMvcProperties webMvcProperties) {
    DispatcherServlet dispatcherServlet = new DispatcherServlet();
    dispatcherServlet.setDispatchOptionsRequest(webMvcProperties.isDispatchOptionsRequest());
    dispatcherServlet.setDispatchTraceRequest(webMvcProperties.isDispatchTraceRequest());
    dispatcherServlet.setThrowExceptionIfNoHandlerFound(webMvcProperties.isThrowExceptionIfNoHandlerFound());
    dispatcherServlet.setPublishEvents(webMvcProperties.isPublishRequestHandledEvents());
    dispatcherServlet.setEnableLoggingRequestDetails(webMvcProperties.isLogRequestDetails());
    return dispatcherServlet;
}
下面看个有趣的:
@Bean
// 容器中 MultipartResolver 类型的组件必须存在
@ConditionalOnBean( MultipartResolver 类型的组件必须存在.class)
// 容器中名为 multipartResolver 的组件必须不存在
@ConditionalOnMissingBean(name = DispatcherServlet.MULTIPART_RESOLVER_BEAN_NAME)
// @Bean 修饰的方法的参数,spring 会从 IOC 容器中找到对应的组件传递给该方法
public MultipartResolver multipartResolver(MultipartResolver resolver) {

    // 作用:如果用户定制了自己的 MultipartResolver 类型的组件,但是注册到容器中的名称不是 multipartResolver
    // 这里就会将其重命名为 multipartResolver
    // Detect if the user has created a MultipartResolver but named it incorrectly
    return resolver;
}
同时还有很多地方用到了 @ConditionalOnMissingBean 注解,要么是为了规范化,要么是用户没有配置spring会自动配置。这也是 SpringBoot 的一种设计模式。
4、总结
- SpringBoot 先加载所有的自动装配类
- 每个自动装配类会按照条件自动生效,默认都会绑定配置文件相关联的配置类
- 生效的配置类会给容器中装配很多组件
- 只要容器中有这些组件,相当于这些功能就有了
- 只要用户有自己的配置就以用户的优先
- 定制化配置:
- 用户直接使用 @Bean 替换底层组件
- 用户修改指定组件绑定的配置文件
xxxAutoConfiguration –> 注册组件 –> 组件从 xxxProperties 中获取相关的配置属性 —> application.properties
实践
- 引入所需场景依赖(starter)https://docs.spring.io/spring-boot/docs/current/reference/html/using.html#using.build-systems.starters
- 查看自动配置哪些组件
- 自己分析:根据源码
- 在配置文件中开启:
debug=true,那么启动项目时控制台会打印自动配置相关的报告
- 是否需要修改
- 参照官方文档修改配置项:https://docs.spring.io/spring-boot/docs/current/reference/html/application-properties.html#application-properties
- 分析源码找到配置文件类
- 自定义加入组件或者替换组件
- @Bean、@Component ……
- ……
- 比如自定义器:xxxCustomizer
- 参照官方文档修改配置项:https://docs.spring.io/spring-boot/docs/current/reference/html/application-properties.html#application-properties
四、自定义 starter
初步了解了 SpringBoot 自动装配原理后,我们可以定制我们自己的 starter,官方建议第三方提供的 starter 命名规范是 *-spring-boot-starter。
1、创建 Maven 工程
首先需要创建一个空 Maven 工程,然后提供 SpringBoot starter 所需要的核心依赖:
注意这里的版本最好和使用的 SpringBoot 版本一致
<dependency>
    <groupId>org.springframework.boot</groupId>
    <artifactId>spring-boot-starter</artifactId>
    <version>2.6.0</version>
    <scope>compile</scope>
</dependency>
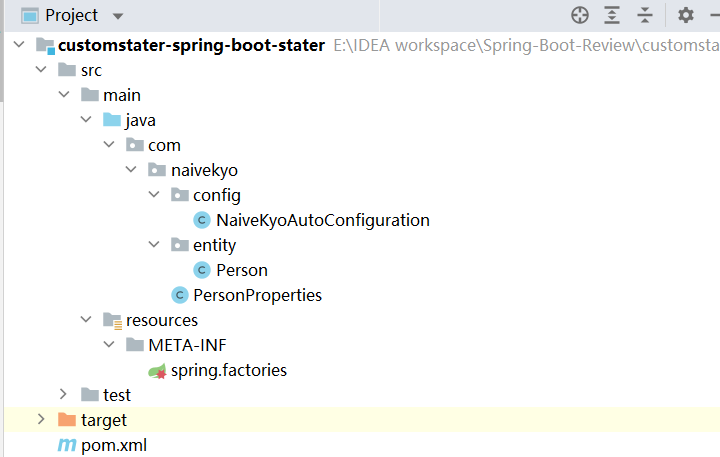
Maven 工程目录结构如下:

pom.xml
<dependencies>

    <dependency>
        <groupId>org.springframework.boot</groupId>
        <artifactId>spring-boot-starter</artifactId>
        <version>2.6.0</version>
        <scope>compile</scope>
    </dependency>

</dependencies>
代码如下:
NaiveKyoAutoConfiguration.java
// 声明这是一个配置类,采用 Lite 模式加载
@Configuration(proxyBeanMethods = false)
// 将 PersonProperties 注册到 IOC 容器并将其绑定的配置文件中相关属性注入该组件中
@EnableConfigurationProperties(PersonProperties.class)
// 如果类路径下有 Person 的 class 文件,就加载当前配置类
@ConditionalOnClass(Person.class)
public class NaiveKyoAutoConfiguration {

    // 向容器中注入 Person 组件 (参数中的 personProperties 是从 spring 容器中获取的)
    @Bean
    @ConditionalOnMissingBean(Person.class) // 如果容器中没有 Person 就注册它
    public Person person(PersonProperties personProperties) {

        return new Person(personProperties.getName(), personProperties.getAge(), personProperties.getDesc());
    }
}
Person.java
这个自定义 stater 最主要的目的就是将 Person 注册到 IOC 容器中。
public class Person {

    private String name;

    private Integer age;

    private String desc;

    public Person() {
    }

    public Person(String name, Integer age) {
        this(name, age, null);
    }

    public Person(String name, Integer age, String desc) {
        this.name = name;
        this.age = age;
        this.desc = desc;
    }

    public String getName() {
        return name;
    }

    public void setName(String name) {
        this.name = name;
    }

    public Integer getAge() {
        return age;
    }

    public void setAge(Integer age) {
        this.age = age;
    }

    public String getDesc() {
        return desc;
    }

    public void setDesc(String desc) {
        this.desc = desc;
    }

    @Override
    public String toString() {
        return "Person{" +
                "name='" + name + '\'' +
                ", age=" + age +
                ", desc='" + desc + '\'' +
                '}';
    }
}
PersonProperties.java
配置类如下:
@ConfigurationProperties(prefix = "naivekyo")
public class PersonProperties {

    private String name = "NaiveKyo";

    private Integer age = 22;

    private String desc = "Hello Developer! This is NaiveKyo.";

    public String getName() {
        return name;
    }

    public void setName(String name) {
        this.name = name;
    }

    public Integer getAge() {
        return age;
    }

    public void setAge(Integer age) {
        this.age = age;
    }

    public String getDesc() {
        return desc;
    }

    public void setDesc(String desc) {
        this.desc = desc;
    }
}
spring.factories
我们知道 SpringBoot 项目启动时会从 spring-boot-autoconfigure 这个 jar 包的 META-INF/spring.factories 文件中找到所有的自动装配类的全类名路径。
可以仿照其规则,在当前自定义 stater 的 resource 目录下新建 META-INF 目录,同时新建 spring.factories 文件:
# Auto Configure
org.springframework.boot.autoconfigure.EnableAutoConfiguration=\
com.naivekyo.config.NaiveKyoAutoConfiguration
2、打包并导入依赖
首先将我们定制的 stater 打成 jar 包:
首先打开 stater 工程的 pom 文件所在的文件夹,打开命令行:
先输入:mvn clean
然后输入:mvn install
打包成功后就会输出到本机安装的 maven 配置文件指定的本地仓库中:

然后直接在测试工程中导入依赖:
<!-- 引入自定义的 stater -->
<dependency>
    <groupId>org.naivekyo</groupId>
    <artifactId>customstater-spring-boot-stater</artifactId>
    <version>1.0-SNAPSHOT</version>
</dependency>
3、测试
测试代码:
// 测试 10: 测试自定义 stater jar 包
@RequestMapping(value = "/test10", method = RequestMethod.GET)
@ResponseBody
public String test10() {

    NaiveKyoAutoConfiguration autoConfiguration = this.applicationContext.getBean(NaiveKyoAutoConfiguration.class);

    PersonProperties properties = this.applicationContext.getBean(PersonProperties.class);

    Person person = this.applicationContext.getBean(Person.class);

    System.out.println(" ========================= ");

    System.out.println(autoConfiguration);
    System.out.println(properties);
    System.out.println(person);

    System.out.println("===========================");

    return "ok10";
}
此处如果我们没有在 application.properties 文件中配置以 naivekyo 开头的属性就会使用默认的属性:
/**
	没有自定义配置时显示:
    com.naivekyo.config.NaiveKyoAutoConfiguration@3d672003
    com.naivekyo.PersonProperties@2f70d39e
    Person{name='NaiveKyo', age=22, desc='Hello Developer! This is NaiveKyo.'}
*/
在配置文件中设置后:
naivekyo.name = NaiveKyo
naivekyo.age = 23
naivekyo.desc = This is NaiveKyo.
再次调用测试代码:
/**
    com.naivekyo.config.NaiveKyoAutoConfiguration@555c6ae0
    com.naivekyo.PersonProperties@378b7e36
    Person{name='NaiveKyo', age=23, desc='This is NaiveKyo.'}
*/


