ObjectPostProcessor 使用
1、简介
之前了解了 ObjectPostProcessor 的基本概念,所有的过滤器都由对应的配置类负责创建,配置类在将过滤器创建成功之后,会调用父类的 postProcess 方法,该方法最终会调用到 CompositeObjectPostProcessor 对象的 postProcess 方法,在该方法中,会遍历 CompositeObjectPostProcessor 对象所维护的 List 集合中存储的所有 ObjectPostProcessor 对象,并调用其 postProcess 方法对对象进行后置处理。
默认情况下,CompositeObjectPostProcessor 对象中所维护的 List 集合中只有一个对象那就是 AutowireBeanFactoryObjectPostProcessor,调用 AutowireBeanFactoryObjectPostProcessor 的 postProcess 方法可以将对象注册到 Spring 容器中去。
开发者可以自定义 ObjectPostProcessor 对象,并添加到 CompositeObjectPostProcessor 所维护的 List 集合中,此时,当一个过滤器在创建成功之后,就会被两个对象后置处理器处理,第一个是默认的对象后置处理器,负责将对象注册到 Spring 容器中;第二个是我们自定义的对象后置处理器,可以完成一些个性化配置。
自定义 ObjectPostProcessor 对象比较典型的用法是动态权限配置。
2、测试
这里先举一个简单的例子来熟悉 ObjectPostProcessor 的用法:
@EnableWebSecurity
public class SecurityConfig extends WebSecurityConfigurerAdapter {

    @Override
    protected void configure(HttpSecurity http) throws Exception {

        http.authorizeRequests()
                .anyRequest().authenticated()
                .and()
                .formLogin()
                .withObjectPostProcessor(
                        new ObjectPostProcessor<UsernamePasswordAuthenticationFilter>() {
                            @Override
                            public <O extends UsernamePasswordAuthenticationFilter> O postProcess(O object) {

                                object.setAuthenticationSuccessHandler(((request, response, authentication) -> {
                                    response.getWriter().write("login success");
                                }));

                                return object;
                            }
                        }
                )
                .and()
                .csrf().disable();
    }
}
这个案例中,调用 formLogin 方法之后,开启了 FormLoginConfigurer 的配置,FormLoginConfigurer 的作用是为了配置 UsernamePasswordAuthenticationFilter 过滤器,在 formLogin 方法执行完毕之后,我们调用 withObjectPostProcessor 方法对 UsernamePasswordAuthenticationFilter 过滤器进行二次处理,主要是配置一个登录成功的处理器,当然还可以进行其他配置。
多种用户定义方式
之前介绍的定义用户主要是两种方式:
- 第一种方式是通过重写
configure(AuthenticationManagerBuilder)方法的方式,给全局的AuthenticationManager提供我们自定义的用户获取方式(UserDetailsService); - 第二种方式是当定义了多种数据源时,我们直接向 Spring 容器中注入了
UserDetailsService对象。
那么这两种用户定义方式有什么区别呢?
根据前面的源码分析可知,在 Spring Security 中存在两种类型的 AuthenticationManager,一种是全局的 AuthenticationManager,另一种是局部的 AuthenticationManager。
局部的 AuthenticationManager 由 HttpSecurity 进行配置,而全局的 AuthenticationManager 可以不用配置,系统会默认提供一个全局的 AuthenticationManager 对象,也可以通过重写 configure(AuthenticationManagerBuilder) 方法进行全局配置。
当进行用户身份验证时,首先会通过局部的 AuthenticationManager 对象进行验证,如果验证失败,则会调用其 parent 也就是全局的 AuthenticationManager 再次进行验证。
所以开发者自定义用户时,也分为两种情况,一种是针对局部 AuthenticationManager 定义的用户,另一种则是针对全局 AuthenticationManager 定义的用户。
为了方便演示,接下来直接使用 InMemoryUserDetailsManager 来构建用户对象。
1、针对局部 AuthenticationManager
@EnableWebSecurity
public class SecurityConfig extends WebSecurityConfigurerAdapter {

    @Override
    protected void configure(HttpSecurity http) throws Exception {

        InMemoryUserDetailsManager users = new InMemoryUserDetailsManager();
        users.createUser(User.withUsername("naivekyo").password("{noop}123456").roles("admin").build());

        http.authorizeRequests()
                .anyRequest().authenticated()
                .and()
                .formLogin()
                .permitAll()
                .and()
                .userDetailsService(users)
                .csrf().disable();
    }
}
在上面这段代码中,我们基于内存来管理用户,并向 users中添加了一个用户,将配置好的 users 对象添加到 HttpSecurity 中,也就是配置到局部的 AuthenticationManager 中。
配置完成后,启动项目。项目启动成功后,我们可以使用 naivekyo/123456 登录系统。
但是在启动项目时,控制台输出的日志可以看到以下内容:

这个是系统自动生成的用户,那么我们是否可以使用系统自动生成的用户进行登录呢?答案是可以的。
之前分析过,系统自动提供的用户对象实际上就是向 Spring 容器中注册了一个 InMemoryUserDetailsManager 对象。而之前的代码中,我们没有重写 configure(AuthenticationManagerBuilder) 方法,这意味着全局 AuthenticationManager 是通过 AuthenticationConfiguration#AuthenticationManager 方法自动生成的,在生成的过程中,会从 Spring 容器中查找对应的 UserDetailsUser 实例进行配置(具体配置在 InitializeUserDetailsManagerConfigurer 类中)。所以系统自动提供的用户实际上相当于是全局 InMemoryUserDetailsManager 对应的用户。
以上面的代码为例,当我们开始执行登录后,Spring Security 首先会调用局部 AuthenticationManager 去进行登录校验,如果登录的用户名/密码是 naivekyo/123456,那就直接登录成功,否则登录失败。
当登录失败时,会继续调用局部 AuthenticationManager 的 parent 继续进行校验,此时如果登录的用户名/密码是 user/33964902-65f3-4479-94da-14c4822de6dd,则登录成功,否则登录失败。
这是针对局部 AuthenticationManager 定义的用户,我们也可以将定义的用户配置给全局的 AuthenticationManager,由于默认的全局 AuthenticationManager 在配置时会从 Spring 容器中查找 UserDetailsService 实例,所以我们如果针对全局 AuthenticationManager 配置用户,只需要往 Spring 容器中注入一个 UserDetailsService 实例即可,代码如下:
@EnableWebSecurity
public class SecurityConfig extends WebSecurityConfigurerAdapter {

    @Bean
    UserDetailsService us() {

        InMemoryUserDetailsManager users = new InMemoryUserDetailsManager();
        users.createUser(User.withUsername("root").password("{noop}123456").roles("admin").build());

        return users;
    }

    @Override
    protected void configure(HttpSecurity http) throws Exception {

        InMemoryUserDetailsManager manager = new InMemoryUserDetailsManager();
        manager.createUser(User.withUsername("naivekyo").password("{noop}123456").roles("admin").build());

        http.authorizeRequests()
                .anyRequest().authenticated()
                .and()
                .formLogin()
                .successHandler((request, response, authentication) -> {
                    response.setContentType(MediaType.APPLICATION_JSON_UTF8_VALUE);
                    response.getWriter().write("登录成功!");
                })
                .permitAll()
                .and()
                .userDetailsService(manager)
                .csrf().disable();
    }
}
配置完成,重启项目,此时全局的 AuthenticationManager 在配置时会去 Spring 容器中查找 UserDetailsService 实例,找到的就是我们自定义的 UserDetailsService 实例。
此时我们进行登录时,系统根据我们输入的用户名/密码,先去和 naivekyo/123456 进行匹配,如果匹配失败,再去和 root/123456 进行匹配。
2、针对全局 AuthenticationManager
当然,开发者也可以不使用 Spring Security 提供的默认的全局 AuthenticationManager 对象,而是通过重写 configure(AuthenticationManagerBuilder) 方法来自定义全局 AuthenticationManager 对象:
@EnableWebSecurity
public class SecurityConfig extends WebSecurityConfigurerAdapter {

    @Override
    protected void configure(AuthenticationManagerBuilder auth) throws Exception {

        auth.inMemoryAuthentication().withUser("admin")
                .password("{noop}123456")
                .roles("admin");
    }

    @Override
    protected void configure(HttpSecurity http) throws Exception {

        InMemoryUserDetailsManager manager = new InMemoryUserDetailsManager();
        manager.createUser(User.withUsername("naivekyo").password("{noop}123456").roles("admin").build());

        http.authorizeRequests()
                .anyRequest().authenticated()
                .and()
                .formLogin()
                .successHandler((request, response, authentication) -> {
                    response.setContentType(MediaType.APPLICATION_JSON_UTF8_VALUE);
                    response.getWriter().write("登录成功!");
                })
                .permitAll()
                .and()
                .userDetailsService(manager)
                .csrf().disable();
    }
}
根据之前对 WebSecurityConfigurerAdapter 的源码分析可知,一旦我们重写了 configure(AuthenticationManagerBuilder) 方法,则全局的 AuthenticationManager 对象将不再通过 AuthenticationConfiguration#getAuthenticationManager 方法来构建,而是通过 WebSecurityConfigurerAdapter 的 localConfigureAuthenticationBldr 变量来构建,该变量也是我们重写的 configure(AuthenticationManagerBuilder) 方法的参数。
配置完成后,重启项目,全局的 AuthenticationManager 在构建时直接使用我们重写方法的 auth 变量去构建,使用的用户也是我们配置给 auth 变量的用户。
注意
需要注意的是,当我们重写了 configure(AuthenticationManagerBuilder) 方法后,全局AuthenticationManager 对象中使用的用户,将以该方法定义的用户为准。此时,如果我们还向 Spring 容器中注入了另外一个 UserDetailsService 实例,那么该实例定义的用户将不会生效(因为 AuthenticationConfiguration#getAuthenticationManager 方法没有被调用)。
定义多个过滤器链
在 Spring Security 中可以同时存在多个过滤器链,一个 WebSecurityConfigurerAdapter 实例就可以配置一条过滤器链。
看如下代码:
@EnableWebSecurity
public class SecurityConfig extends WebSecurityConfigurerAdapter {

    @Bean
    UserDetailsService us() {

        InMemoryUserDetailsManager users = new InMemoryUserDetailsManager();
        users.createUser(User.withUsername("root").password("{noop}123456").roles("admin").build());

        return users;
    }

    @Configuration
    @Order(1)
    static class SecurityConfig01 extends WebSecurityConfigurerAdapter {

        @Override
        protected void configure(HttpSecurity http) throws Exception {

            InMemoryUserDetailsManager users = new InMemoryUserDetailsManager();
            users.createUser(User.withUsername("bar").password("{noop}123456").roles("admin").build());

            http.antMatcher("/bar/**")
                    .authorizeRequests()
                    .anyRequest().authenticated()
                    .and()
                    .formLogin()
                    .loginProcessingUrl("/bar/login")
                    .successHandler((request, response, authentication) -> {
                        response.setContentType("application/json;charset=utf-8");
                        String str = new ObjectMapper().writeValueAsString(authentication);
                        response.getWriter().write(str);
                    })
                    .permitAll()
                    .and()
                    .csrf().disable()
                    .userDetailsService(users);
        }
    }

    @Configuration
    @Order(2)
    static class SecurityConfig02 extends WebSecurityConfigurerAdapter {

        @Override
        protected void configure(AuthenticationManagerBuilder auth) throws Exception {

            auth.inMemoryAuthentication().withUser("naivekyo")
                    .password("{noop}123456")
                    .roles("admin");
        }

        @Override
        protected void configure(HttpSecurity http) throws Exception {

            InMemoryUserDetailsManager users = new InMemoryUserDetailsManager();
            users.createUser(User.withUsername("foo").password("{noop}123456").roles("admin").build());

            http.antMatcher("/foo/**")
                    .authorizeRequests()
                    .anyRequest().authenticated()
                    .and()
                    .formLogin()
                    .loginProcessingUrl("/foo/login")
                    .successHandler((request, response, authentication) -> {
                        response.setContentType("application/json;charset=utf-8");
                        String str = new ObjectMapper().writeValueAsString(authentication);
                        response.getWriter().write(str);
                    })
                    .permitAll()
                    .and()
                    .csrf().disable()
                    .userDetailsService(users);
        }
    }

}
在 SecurityConfig 中分别定义了两个静态内部类 SecurityConfig01 和 SecurityConfig02,两个配置类都继承自 WebSecurityConfigurerAdapter,可以分别配置一条过滤器链。
1、SecurityConfig01
在 Security01 中,我们设置过滤器链的拦截规则是 /bar/**,即如果请求路径是 /bar/** 格式的,则进入到 Security01 的过滤器链中进行处理。同时我们配置了局部的 AuthenticationManager 对应的用户是 bar/123456,由于没有重写 configure(AuthenticationManagerBuilder auth) 方法,所以注册到 Spring 容器中的 UserDetailsService 将作为局部 AuthenticationManager 对应的用户。也就是说,如果登录的路径是 /bar/login,那么开发者可以使用 bar/123456 和 root/123456 两个用户登录。


2、SecurityConfig02
在看看 SecurityConfig02,在 Security02 中,我们设置的过滤器链的拦截规则是 /foo/**,即如果请求路径是 /foo/** 格式的,则进入到 Security02 的过滤器链中处理,同时我们配置了局部 AuthenticationManager 对应的用户是 foo/123456,由于重写了 configure(AuthenticationManagerBuilder auth) 方法,在该方法中定义了局部 AuthenticationManager 的 parent 对应的用户,此时注册到 Spring 容器中的 UserDetailsService 对于 /foo/** 过滤器链不再生效。换句话说,如果登录路径是 /foo/login,开发者可以使用 naivekyo/123456 和 foo/123456 两个用户进行登录,而不可以使用 root/123456 进行登录。
3、总结
需要注意的是,如果配置了多个过滤器链,需要使用 @Order 注解来标记不同位置的优先级(即不同过滤器链的优先级),数字越大优先级越低。
当请求到来时,会按照过滤器链的优先级从高到低,依次进行匹配。
静态资源过滤
在一个实际项目中,并非所有的请求都需要经过 Spring Security 过滤器,有一些特殊的请求,例如静态资源等等,一般来说并不需要经过 Spring Security 过滤器链,用户如果访问这些静态资源,直接返回对应的资源即可。
回顾之前分析 WebSecurity 时,提到它里面维护了一个 ignoredRequests 变量,该变量记录的就是所有需要被忽略的请求,这些被忽略的请求将不再经过 Spring Security 过滤器,比如说项目中经常使用的 css、js、image 等资源:
@EnableWebSecurity
public class SecurityConfig extends WebSecurityConfigurerAdapter {

    @Override
    public void configure(WebSecurity web) throws Exception {

        web.ignoring()
                .antMatchers("/login.html", "/css/**", "/js/**", "/image/**");
    }

    @Override
    protected void configure(HttpSecurity http) throws Exception {

        http.authorizeRequests()
            .anyRequest().authenticated()
            .and()
            .formLogin()
            .and()
            .csrf().disable();
    }
}
重写 configure(WebSecurity web) 方法,并配置需要忽略的请求,这些需要忽略的地址,最终都会被添加到 ignoredRequests 集合中,并最终以过滤器链的方式呈现出来。
换句话说,上面的配置中一共包含了五个过滤器链: configure(WebSecurity web) 方法中配置的四个以及 HttpSecurity 中配置的一个(即 /**)。
使用 JSON 格式登录
Spring Security 中默认的登录参数传递格式是 key/value 形式,也就是表单登录方式,在实际项目中,我们可能会通过 JSON 格式来传递参数,这就需要我们自定义登录过滤器来实现。
之前分析过登录参数的提取是在 UsernamePasswordAuthenticationFilter 过滤器中完成的。如果我们需要使用 JSON 格式登录,只需要模仿 UsernamePasswordAuthenticationFilter 过滤器定义自己的过滤器,再将定义的过滤器放到 UsernamePasswordAuthenticationFilter 过滤器所在的位置即可。
1、LoginFilter
代码实现如下,先定义一个 LoginFilter 继承自 UsernamePasswordAuthenticationFilter :
public class LoginFilter extends UsernamePasswordAuthenticationFilter {

    @Override
    public Authentication attemptAuthentication(HttpServletRequest request, HttpServletResponse response) throws AuthenticationException {

        if (!request.getMethod().equals("POST")) {
            throw new AuthenticationServiceException("Authentication method not supported: " + request.getMethod());
        }

        if (request.getContentType().equalsIgnoreCase(MediaType.APPLICATION_JSON_UTF8_VALUE)
            || request.getContentType().equalsIgnoreCase(MediaType.APPLICATION_JSON_VALUE)) {

            Map<String, String> userInfo = new HashMap<>();

            try {
                userInfo = new ObjectMapper().readValue(request.getInputStream(), Map.class);

                String username = userInfo.get(getUsernameParameter());
                String password = userInfo.get(getPasswordParameter());

                UsernamePasswordAuthenticationToken authRequest = new UsernamePasswordAuthenticationToken(username, password);

                setDetails(request, authRequest);

                return this.getAuthenticationManager().authenticate(authRequest);

            } catch (IOException e) {
                e.printStackTrace();
            }
        }

        return super.attemptAuthentication(request, response);
    }
}
(1)首先确保进入该过滤器的请求是 POST 请求;
(2)根据请求的 content-type 来判断参数是 JSON 格式还是 key/value 格式的,如果是 JSON 格式,则直接在当前方法中处理;如果是 key/value 格式的,那就直接调用父类的 attemptAuthentication 方法处理即可;
(3)如果请求参数是 JSON 格式,则首先利用 jackson 提供的 ObjectMapper 工具,将输入流转换为 Map 对象,然后从 Map 对象中分别提取出用户名/密码信息并构造出 UsernamePasswordAuthenticationToken 对象,然后调用 AuthenticationManager 的 authenticate 方法执行认证操作。
其实 LoginFilter 中,从请求中提取去 JSON 参数之后的认证逻辑就和父类 UsernamePasswordAuthenticationFilter 中的认证逻辑是一样的。
2、添加到过滤器链
定义了 LoginFilter 后,我们还需要将其添加到 Spring Security 过滤器链中,代码如下:
@EnableWebSecurity
public class SecurityConfig extends WebSecurityConfigurerAdapter {

    @Override
    protected void configure(AuthenticationManagerBuilder auth) throws Exception {

        auth.inMemoryAuthentication()
                .withUser("naivekyo")
                .password("{noop}123456")
                .roles("admin");
    }

    @Override
    @Bean
    public AuthenticationManager authenticationManagerBean() throws Exception {

        return super.authenticationManagerBean();
    }

    @Bean
    LoginFilter loginFilter() throws Exception {

        LoginFilter loginFilter = new LoginFilter();

        loginFilter.setAuthenticationManager(this.authenticationManagerBean());
        loginFilter.setAuthenticationSuccessHandler((request, response, authentication) -> {
            response.setContentType(MediaType.APPLICATION_JSON_UTF8_VALUE);
            response.getWriter().write(new ObjectMapper().writeValueAsString(authentication));
        });

        return loginFilter;
    }

    @Override
    protected void configure(HttpSecurity http) throws Exception {

        http.authorizeRequests()
                .anyRequest().authenticated()
                .and()
                .formLogin()
                .and()
                .csrf().disable();

        // 我们自定义的过滤器需要顶替 UsernamePasswordAuthenticationFilter 在过滤器链中的位置
        http.addFilterAt(this.loginFilter(), UsernamePasswordAuthenticationFilter.class);
    }
}
(1)首先重写 configure(AuthenticationManagerBuilder auth) 方法来定义一个登录用户;
(2)重写父类的 authenticationManagerBean 方法来提供一个 AuthenticationManager 实例,后面要配置给 LoginFilter;
(3)配置 loginFilter 实例,同时将 AuthenticationManager 实例设置给 loginFilter,然后再设置登录成功回调。当然,我们也可以再 loginFilter 中配置用户名/密码的参数名或者登录失败的回调;
(4)最后在 HttpSecurity 中,调用 addFilterAt 方法将 loginFilter 过滤器添加到 UsernamePasswordAuthenticationFilter 过滤器所在的位置。
配置完成后,重启项目,此时我们就可以使用 JSON 格式的数据来进行登录操作了: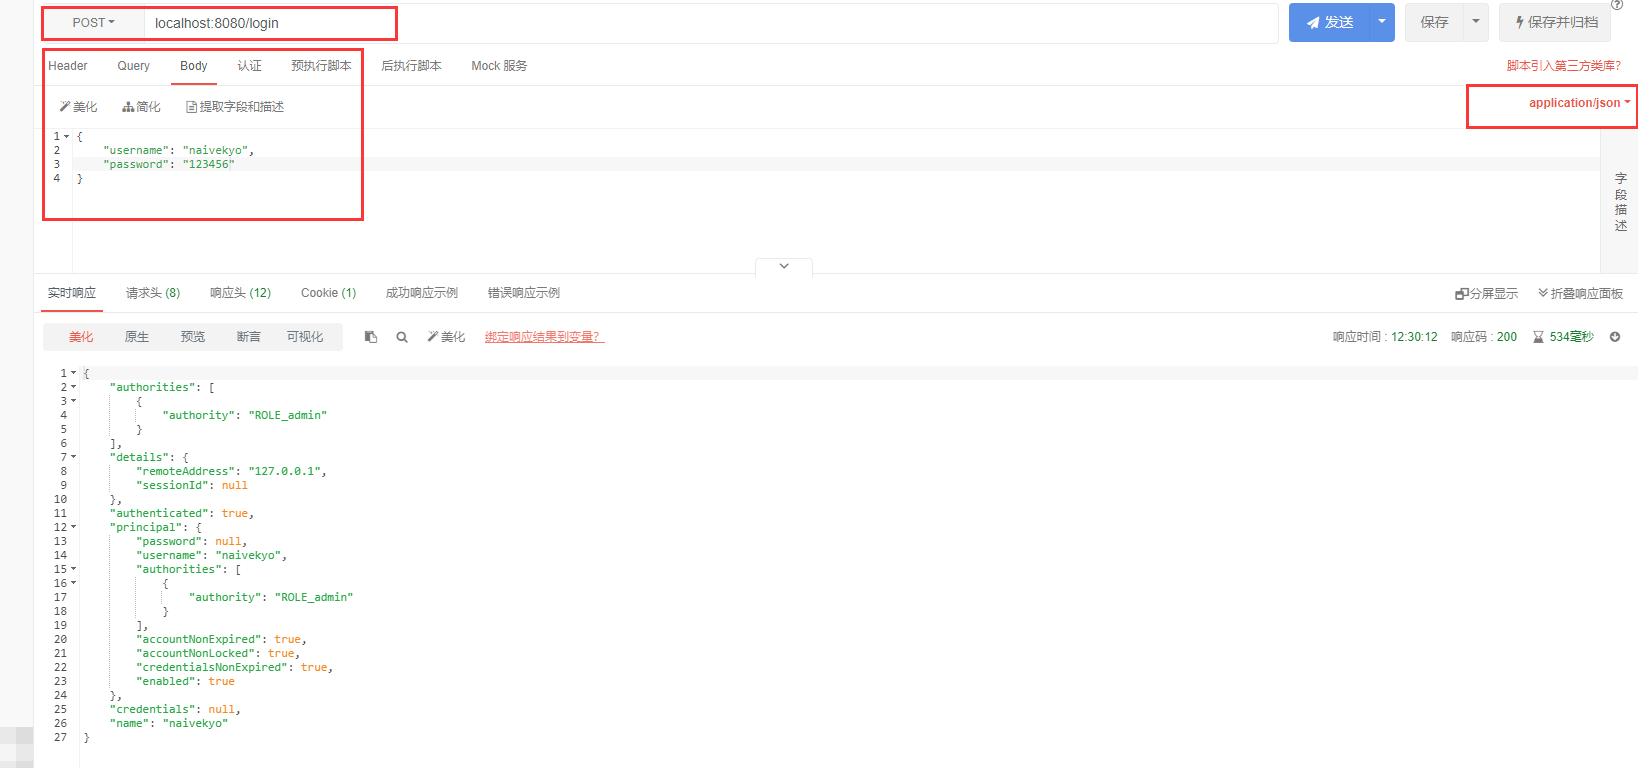
3、总结
当我们想要获取一个 AuthenticationManager 实例时,有两种不同的方式:
- 第一种是重写父类的
authenticationManager方法获取; - 第二种是通过重写父类的
authenticationManagerBean方法来获取。
表面上看这两种方式获取到的 AuthenticationManager 在这里都可以运行,但实际上是有区别的。区别在于第一种获取到的是全局 AuthenticationManager 实例,而第二种获取到的是局部的 AuthenticationManager 实例,而 LoginFilter 作为过滤器链中的一环,显然是应该配置给局部的 AuthenticationManager 实例,因为如果将全局的 AuthenticationManager 实例配置给 LoginFilter,则局部的 AuthenticationManager 实例所对应的用户就会失效,例如如下配置:
@EnableWebSecurity
public class SecurityConfig extends WebSecurityConfigurerAdapter {

    @Override
    protected void configure(AuthenticationManagerBuilder auth) throws Exception {

        auth.inMemoryAuthentication()
                .withUser("naivekyo")
                .password("{noop}123456")
                .roles("admin");
    }

    @Override
    @Bean
    protected AuthenticationManager authenticationManager() throws Exception {
        return super.authenticationManager();
    }

    @Bean
    LoginFilter loginFilter() throws Exception {

        LoginFilter loginFilter = new LoginFilter();

        loginFilter.setAuthenticationManager(this.authenticationManager());

        loginFilter.setAuthenticationSuccessHandler((request, response, authentication) -> {
            response.setContentType(MediaType.APPLICATION_JSON_UTF8_VALUE);
            response.getWriter().write(new ObjectMapper().writeValueAsString(authentication));
        });

        return loginFilter;
    }

    @Override
    protected void configure(HttpSecurity http) throws Exception {

        InMemoryUserDetailsManager users = new InMemoryUserDetailsManager();
        users.createUser(User.withUsername("user").password("{noop}123456").roles("user").build());

        http.authorizeRequests()
                .anyRequest().authenticated()
                .and()
                .formLogin()
                .and()
                .csrf().disable()
                .userDetailsService(users);

        http.addFilterAt(this.loginFilter(), UsernamePasswordAuthenticationFilter.class);
    }
}
在这段代码中,我们可以使用 naivekyo/123456 以 JSON 格式进行登录,因为它是配置给全局 AuthenticationManager 的用户,但是无法使用 user/123456 以 JSON 格式登录,因为 LoginFilter 中指定了全局的 AuthenticationManager 来做验证,所以局部的 AuthenticationManager 实例就失效了。
在实际应用中,如果需要自己配置一个 AuthenticationManager 实例,大部分情况下,我们都是通过重写 authenticationManagerBean 方法来获取的。
小结
Spring Security 初始化过程对于开发者而言是非常重要的,这主要体现在两个方面:
- 第一:理解 Spring Security 初始化流程之后,开发者就可以随心所欲地根据自己的项目需求去定制 Spring Security;
- 第二:如果在 Spring Security 使用的过程中出现了问题,理解了初始化流程之后,问题的排查也会变得非常容易。